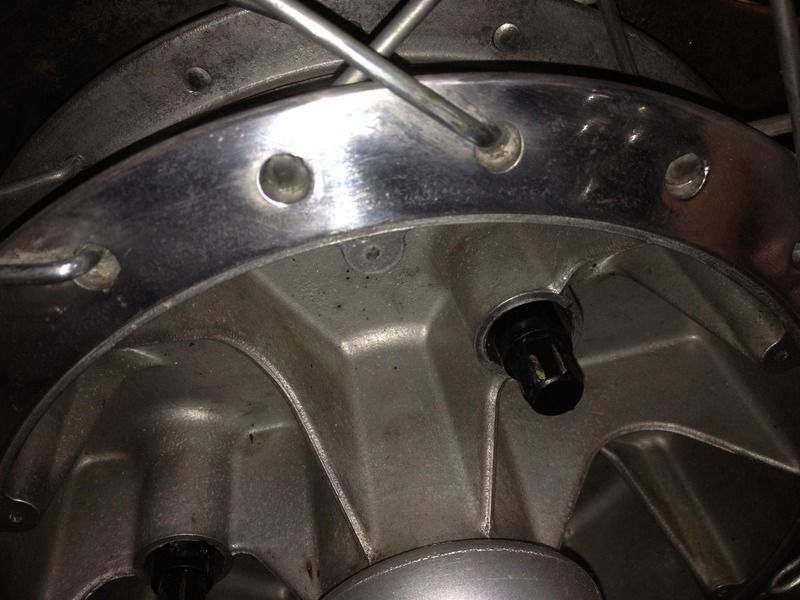
At least 4 of the pins that hold on the cover to the right hand side of the rear hub have sheared off flush.
Does anyone have a cunning plan on how to remove them as I would imagine it's going to be virtually impossible to drill them out with all that soft alloy surrounding them?
Bob, that's what I did. I…
- Log in to post comments
Previously Neil Wyatt wrot…
Previously Neil Wyatt wrote:
Bob, that's what I did. I used my smallest drill bit and drilled into the broken levelled pin, all of them were like that and so I bought a set of stainless self tappers from RGM meant for the job, along with a new polished alloy cover. There were no problems except one screw went in at an angle but a solid repair.
You don't need much of a hole, the self tappers, though tiny are sharp and grip well.
Hello All Well I had a go at this one and these small rivets are made from some very hard stuff brass rivets would be better but I trieddrilling them and broke everydrill bit and did not make a scratchin the rivet head and I was using Cobalt drill bits and black diamond-tipped drill bit are hard to get now even small bit drills I aways use a press drill for this type of work . so what are the answers to this one yours anna j
- Log in to post comments
Hello well I think some ty…
Hello well I think some type of guider to keep the drill in the right place untilyou get the drill to make its hole has these small rivets are very hard todrill and is a challenge even for a skilled machinist, yes these small pins or rivets are not easy to get out and very challenging for the best of us, yours anna j
- Log in to post comments
Indeed Anna and why one of…
Indeed Anna and why one of my holes was at a slight angle but you don't need much of a hole, more of an indent and I used the same very small dia drill bit and the RGM stainless tiny screws went in without problems. Don't ask why, but they did?
- Log in to post comments
If your best centre punch…
If your best centre punch will make a mark then it should be possible to drill. As Anna has said use a drill press (pillar drill to us limeys) and clamp the job down to prevent movement. No farting around with a hand held black and decker. I have a wheel where the previous owner just drilled 6 holes next to the original knackered ones, I can still get a socket on the three sleeve nuts. If you really can't get a drill to touch the screws then spark erosion would be the next step.
- Log in to post comments
Yes the original rivets ar…
Yes the original rivets are are extremity hard and no drill would touch them, I seem to remember they had rifled shanks as well just to make extraction even more difficult
I destroyed the already damaged light alloy hub cover and used ground down pincers to remove two of the blighters, the others were either already headless or the heads sheared under the pincers. I then took the hub to a specialist engineer in such matters and they removed the broken shanks for a price!! Spark erosion i think.
One hole had been damaged by me and was enlarged a little, could have been alloy welded but bearing in mind the light nature of the hub cover i filled the hole with soft solder and tapped it down with a punch, drilled a pilot hole and alls well.
- Log in to post comments
The originals are what's…
The originals are what's known as milled rivets which are hardened and bite into the soft aluminium when hammered home. The easier alternative is to slightly offset the cover and drill new holes alongside the existing ones as there is plenty of casting and use the stainless screws as mentioned.
- Log in to post comments
Thanks for all your sugges…
Thanks for all your suggestions guys, I thought I might have trouble trying to drill them out. So I will drill down one side of each pin to slightly offset things and get some RGM screws.
Cheers, Bob
- Log in to post comments
Just a quick update and a…
Just a quick update and a thank you for your replies.
I ordered the new bits from Andover Norton. I used a centre punch to create a mark adjacent to each of the snapped off pins and then drilled a 2.5mm hole about 5mm deep. A squirt of '3 in One' into each hole and then wound the self tappers in - below are the results.
- Log in to post comments


Bob, that's what I did. I used my smallest drill bit and drilled into the broken levelled pin, all of them were like that and so I bought a set of stainless self tappers from RGM meant for the job, along with a new polished alloy cover. There were no problems except one screw went in at an angle but a solid repair.
You don't need much of a hole, the self tappers, though tiny are sharp and grip well.