
1) Further to recent missives concerning my 650SS, I am replacing the three studs in the cylinder head - or at least, I am trying to. I have removed the one at the back of the head, but the other two, one under each exhaust port, are proving difficult. I have tried putting two nuts on each stud and tightening them together to form a lock nut, then tried to spanner the studs out without success. I have tried using Mole grips, both on the head at ambient temperature, and with local heat applied, all without success. The studs have several graunch marks on them now! Has anybody got any more ideas, especially if you live in the Bristol area?
2) I have siamese pipes on my machine, which, with some difficulty, and the judicious use of some light 'brute force', I have managed to seperate to make it easier to fit back to the head later. Has anyone found a method of reassembly which will allow easier seperation at some later stage? Would Copperslip grease help. Any suggestions would be gratefully received.
Thanks,
David Francis
Heat the head in the oven…
- Log in to post comments
Stud removing socket
I've used one but don't have one - it is like a large socket with 3 knurled wheels inside on eccentric pins. Works like a sprag clutch in that the more you tighten, the more it grips. Worked on a stripped thread stud for me. With one, you should be able to get more torque on it than using moles.
I agree with Howard in that heat is your friend. Heat the head in the oven first, but limit the heat to 180°/gas mark 6 or the alloy properties can change.
Another 'trick' that can help is the freezer spray that plumbers use. With the head oven hot, spray the stud with freezer spray and immediately try and turn it.
Good luck and I hope you get there.
George
- Log in to post comments
Removing studs
I use standard roller type stud extractors for removing and fitting studs. They are similar in appearance to an extended socket and the internals have a cam action and they do not damage the stud. They are sold in sets covering the most common stud sizes. Care needs to be taken when removing stubborn smaller diameter studs as the grip is so effective one can easily shear the stud. However a combination heat where practical can help too.
Copper ease is always useful and also helps to reduce the galling of threads in particular on stainless steel.
George
- Log in to post comments
If stud shear, is it…
If stud shear, is it practical to use a left hand twist drill. In a rigid bench press drill or preferably a stiff machine?
- Log in to post comments
Cylinder head studs.
Hi David , all of the advice will work with care, as one member has indicated with the head held firmly and the extra torque available with a stud extractor you can quite easily shear the stud. On no account should you use an oxygen torch unless you are very very conversant with one of these tools. I find that the oven method works well , but it helps if each of the studs is given a sharp vertical wack with a hammer..Before attempting to turn the stud, just make sure you have something between the end of the stud and the hammer, a piece of aluminium or brass, although it seems your studs might be scrap anyway.
- Log in to post comments
use a vice
assuming you are replacing studs then damage to threads will not matter, hold one in a vice and turn the head. you should get half a turn before other stud fouls vice. if it still slips in vice, file a flat on the stud and try again.
got to ask, why do you want them out, if the threads are good leave them in.
regards Martin
- Log in to post comments
650SS cylinder head studs.
The reason for the need to change is that the threads on the other end of the studs are looking worse for wear, so I thought I'd change them while I've got the head off, to save possibly having to do it again later.
Regards,
David Francis
- Log in to post comments
If the threads are not too bad...
I'd be tempted to just run a die down them. They're probably made of better material than a lot of the after market stuff that's around.
- Log in to post comments
Cylinder head studs replacement on Dominator series + exhaust pi
Have run a die down the threads, they still look a little 'iffy'.
- Log in to post comments
stud removal tool
hello, none of you has mentioned a stud removal tool which I would use after being in the oven for a half-hour the thread into the head is Whitworth 5/16 for the front 3 and 3/8 at the rear stud the fine threads are cycle 26tpi and not BSF the other way is to file a flat on either side of the stud so you can get a spanner to fit and as low as possible and try the oven method first someone as used Loctite on the threads, hope you win in the end try not to snap the studs if all fails you can away send it to me only cost you the postage As I have the skills and a well tooled up workshop yours anna j
- Log in to post comments
Cylinder head studs replacement on Dominator series + exhaust pi
Hi, Anna,
Maybe some of the later engines had 5/16" studs at the front (don't know about the back), but mine are all 3/8", BSF into the head, with BSCY through the barrels.Looks like there is some kind of gunge on the studs, perhaps it's Loctite or similar.
- Log in to post comments
front 3 studs
Hello well my 1960 Norton Manxman 650 As 3 front studs that are 5/16 and I can send you photos of them if you like
- Log in to post comments
Anna - David is talking…
Anna - David is talking about the three studs into the cylinder head not the studs into barrel. If yours are indeed 5/16 inch please can we have an image or two ? Regards, Howard
- Log in to post comments
Pretty sure my 1960 99 head…
Pretty sure my 1960 99 head studs are 5/16" ,A 60 Manxman is unlikely to be different.
- Log in to post comments
Radko recommends drilling…
Radco recommends drilling studs to remove them if broken. Accurate centre punch and slowly increase drill sizes. For sound studs he only recommends the twin nut method. But, and perhaps this might be relevant, he says to odd Loctite Stud-lock. So there's a problem for future removal. If so Loctite is weakened by heat. Bit it all sounds a lot of work if the damage is cosmetic. If the twin nuts will not remove it, surely it must able to safely take a nut for service use?
- Log in to post comments
I have used a knurled…
I have used a knurled socket stud tool as described by George, not expensive . I also impact the stud to jar the threads first and use a shock tactic rather than a steady pull. I have also drilled out stud remains and peeled out the thread remnants . If all goes wrong a Re-thread insert will save the day.
- Log in to post comments
Just in case there are any…
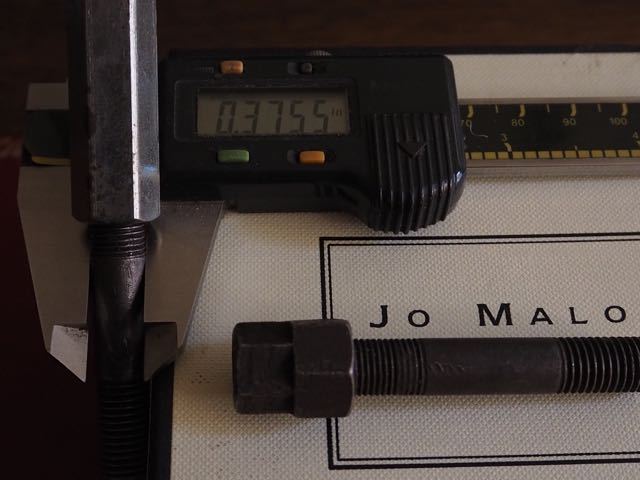
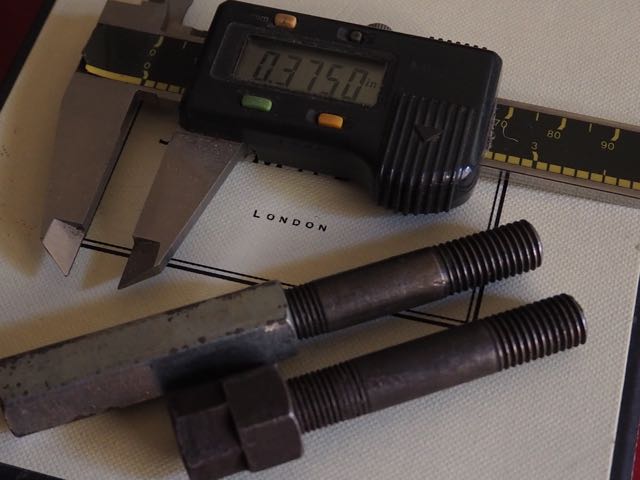
Just in case there are any readers of this Technical Forum new to Norton twins and wanting facts not fairy stories here are a couple of images of the offending studs. As you can see they are 3/8 inch BSF threads into the head and 3/8 inch BSC for the nuts. The images also show the rear nut with double hex (one reduced to allow access whilst fitted) and one of the front nuts. Get some heat on them if they have to be removed. Cheers Howard
- Log in to post comments
There are 2 front 5/16 studs…
There are 2 front 5/16 studs ,but they are Barrel to head.
- Log in to post comments
If you'd read my posting on…
If you'd read my posting on 27th March you would have seen that David was referring to the three studs into the head not the barrel........The lesson is if you can't be correct in what you write then don't write at all. I thought that you were being chivalrous because Ms Dixon often gets a misconception of the facts and writes rubbish. She is very capable of standing her own corner. Stay safe, Howard.
- Log in to post comments
I don't read acidic…
I don't read acidic postings if I can help it. Anna has plenty of Helpful info , just has some dyslexic issues . If members won't post because they may make an error the site will die like many others.
- Log in to post comments
Removing studs
This tip came from a friend who was a tool and die maker:
Instead of locking two nuts together, which can stretch the threads, get a nut of the correct size and thread, cut a slot in it across one of the flats with a hacksaw. Now screw this nut onto the stud and grip it with a pair of vice grips (mole grips) either side of the slot. This way you can grip the stud really tightly. Of course, the above comments regarding heat application are valid and will help the process.
- Log in to post comments
Not stainless steel replacements
Whether or not the studs need replacing (they look fine in the photos, but perhaps I've not read it properly) I wouldn't advise replacing them with stainless steel studs, in spite of how irresistible it seems to be for many owners. The original studs, nuts and bolts that secure head to barrel and barrel to crankcase are high tensile and arguably the most stressed fixings on any IC engine, apart from the crankshaft fixings. Make sure you know what stress grade of S/S you are getting and that it is comparable to the original HT grade. Do NOT buy A2 grade!
Ideally you need something the equivalent to Grade 8.8. Anna might confirm this - being a marine engineer. I did some research recently and asked Andy Molnar what he uses - he uses 303 - which has a tensile strength in the range of 500 - 750 N/mm2 (a touch low for my liking) whereas 8.8 Grade is 828 N/mm2. The 303 is more useful if you want machinability as it has sulphur added. This slightly reduces is corrosion resistance. Not a problem with old, oily bikes! A4-80 is OK at 800 N/mm2.
If using stainless I would always use HT for engine plates too. Whatever you use, I would recommend tensile strengths of over 500 N/mm2 for stressed fixings.
The other problem with some S/S grades seems to be a greater Elastic Limit - it stretches more, which is not good for head or barrel fixings.
Some well known (?) myths about "Stainless Steel" : -
1) It doesn't rust/corrode - some grades do, especially in marine environments (Anna can confirm)
2) It is non-magnetic - check your cutlery drawer with a magnet!
3) It is "stainless" - check your kitchen sink and any workshop sink you have used chemicals in!
The term is a touch misleading then!
My experience is mainly as a civil/structural engineer, plus 50 years of experience with cars (Specialising in XK engined Jaguars) but I have been retired for almost 9 years so I've forgotten more than you will ever know. :-)
Keep safe out there!
- Log in to post comments
Hi Lionel, I agree with…
Hi Lionel,
I agree with most of your comments regarding bolt materials but not with the strength of Grade 8.8 bolts. You have obviously got your specified 828 N/mm2 from a table as it is such a precise number.
The Grade references for bolts in the ISO metric system are really quite straight forward in that the first number relates to the minimum U.T.S. of the material in kgf/mm2 divided by 10 and the second number is it's minimum yield strength as a % of it's U.T.S.
Thus a Grade 8.8 bolt would have a minimum tensile strength of 80 kgf/mm2 and a minimum U.T.S of 80 x 80/100 = 64 kgf/mm2.
Or in Newtons, 80 x 9.81 = 785 U.T.S. and 64 x 9.81 = 628 yield strength. This would make the strength of some of the stainless fasteners more acceptable but still not preferred on my bike.
The attached photograph illustrates this along with ISO Unified inch and Whitworth comparison data as many Nortons were fitted.
Regards
Dick
- Log in to post comments
Table?
Well, yes Dick that was from a table - as as you have used. Normal design procedure for a Structural Engineer. The "elasticity" of some stainless steels is undesirable in fixings such as used for heads and barrels. Plastic and elastic limits are different to the older general spec of "High Tensile" high carbon steels. With fixings we are never interested in going to a plastic limit, unlike structural design but elastic limits could be a consideration.
- Log in to post comments
misunderstud
Hello I THINK I have missunderstud the 3 studs you talking about are 3/8 witworth into the head best way to remove these is with a stud remover like my one witch can remove stud of most sizes up to 5/8ths its a very good Draper. One and what was the question about. The Exhaust pipes as most Aftermarket exhausts I have see are very bad fitting and none at all will fit my Norton Manxman 650 as they are 1.5/8 full bore and specially shaped to fit the Manxman Silencers and No other Norton was fitted with this set up. And as dislyxer gose Thomas's Newcoman the invented of the steam beam engine 1712 he was a blacksmith and was dislyxic , yours. Anna J
- Log in to post comments
No Knurling ....
Just as a matter of interest and in response to Robert’s post on stud extractors, the extractors that I was referring to are not knurled but comprise of plain rollers which do not damage the stud. They grip tightly due to the internal cam action.
George
- Log in to post comments
Exhaust pipe issue - nobody…
Exhaust pipe issue - nobody has mentioned your second question. My siamesed pipes have never jammed, and I don't see why they should. They aren't left to go rusty, and the insides are black with the usual deposits. But I do use copperslip on the rose nuts. One or two writers have claimed it goes hard with age, but it's never given me any problems in removing the nuts, and nothing seems to have been damaged.
- Log in to post comments
As Lionel says.. for Norton…
As Lionel says.. for Norton fixings we don't want our bolts to go plastic. Usually. Con rod bolts are usually not reused because they really are stretched to the plastic limit. Usually safely because the limit is reached on the parallel waisted portion and not deep inside the threads. The old fashioned mechanic's "feel" is really looking for the start of permanent stretch. With nice old ductile mild steel (grade 4.6 typically) they are fairly tolerant of such abuse. But for very compact modern fasteners in modern vehicles we find cylinder head bolts that are first snugged up hard with a simple spanner, and then given a specified extra turn to take right up beyond the yield point. So you need new ones every time to replace the cylinder head, because the high strength fasteners usually have a smaller gap from yield to ultimate. So we move from 4.6 to 10.9 and beyond.
Is this too far off topic or are we all as bored as I am?
- Log in to post comments


Heat the head in the oven first and then get an industrial oxy/aceteline torch on the alloy around each stud separately and using the double-nut method they usually come out. If they have been assembled with a thread lock adhesive the extra heat should break the resin and heating the head up evenly beforehand should stop the extra heat dissipating too quickly. The thread into the head is BSF if my memory serves me correctly and is easily stripped so if all else fails just tighten the nut against a spacer and strip it out. Then of course you will need to make oversize stepped studs or fit helicoils into the blind holes. Persevere and you will do it. Regards, Howard