
I'm getting ready to assemble my 1962 ES2 engine after a complete overhaul. I have not been able to find info on torque settings. Specifically the 3 sizes of case studs (5/16 3/8 7/16), head bolts and rocker box. Any documents or consensus much appreciated. Thanks Paul
Different tech periods
- Log in to post comments
Spanners were all made in different lengths
Spanners were all made (and still are) in different lengths for different size bolt diameters to give different torques.
This gives the user roughly the correct torque if used with 'feel'. This 'feel' only comes with experience and early on one can expent to snap the odd bolt or strip a few threads due to overtightening. Due dilligence will be required when tightening studs that are threaded into aluminium castings.
You can always re-tighten a stud or nut, but once it's stretched, stripped or snapped - it's fubar!
- Log in to post comments
Thanks Jonathon & Bob. I…
Thanks Jonathon & Bob. I especially liked the comment about the origins in the steam age. When I first disassembled this engine I commented to my brother that it looked like it was made by a blacksmith, a good blacksmith! I have a lifetime of wrenching (do you call it spannering?) on all manner of machinery and well understand the perils of fastening dissimilar metals. I've had this ES2 for about 12 years and it is truly a joy to ride but leaked oil like a sieve. My quest is to join the select few with an oil tight Norton. I've surfaced and laped all joints, corrected assembly mistakes and missing parts by a PO and with modern joining compounds have high hopes. As they say "better to travel in hope than to arrive in despair" Thanks again Paul
- Log in to post comments
As bolt strengths become…
As bolt strengths become higher, their ductility (the amount they can stretch permanently before they break) becomes lower. So a relatively low strength bolt stretches a comparatively long way after it first begins to stretch. That's the mechanic's 'feel' point, and its why torque wrenches weren't needed in earlier designs (especially when they were were expected to be taken apart in the street for regular decoking). High strength bolts give much less warning between the points when they start to stretch and then snap, so careful control is much more important. Modern critical bolts are likely not to be re-usable.
- Log in to post comments
DVD
Paul, the singles DVD by Mike Pemberton in the NOC shop is a worthwhile investment. I also have a 62 ES2.
Mike advises cyl head bolts at 32ft lb taken in stages from 24, 28 to 32. Rocker box bolts are 12 ft lb. Oh, and I mostly make my own gaskets from a batch of asst gasket papers(ebay).
hope this helps
John.
- Log in to post comments
ES2 Torque Settings redirect to Oil tight ES2
Thanks John, The journey continues on the quest of an oil tight ES2. I've searched the forum and got a lot of very helpful advise and varied opinions. I am focusing now on crankcase breathing. Mine had only an open pipe and no gasket at the alternator spigot piece. I've measured the timed breather and it seems to by about 30 degrees each side of BDC so should act more as an intake and to cool the drive side main. I am going to first try the correct ball valve breather with a Royal Enfield duck bill exiting at the drive chain. If that fails I'll try some of the other suggested plumbing routs of the breather or maybe a reed valve or PCV valve. Specifics on either much appreciated. As noted all mating surfaces have been machined and lapped and I plan to use Hylomar blue. So if I can get crankcase pressure to neutral or possibly slightly negative what could possibly go wrong ? :-)
Paul
- Log in to post comments
What could possibly go wrong?
Paul,
I put a 3/8 ball type check valve on the timed breather on my 1956 ES2, like you are proposing.
It worked so well that I now have to lube the timing chain every few months!
True!
Very annoyed to find Norton put an anti wet sumping device on the ES2 the following year.
My M20 BSA had one that needed the tap with a drift treatment early on. But it never wetsumped again after that. Even after 12 months.
- Log in to post comments
Oil tight ES2
Hi Paul it is quite easy to get your bike oiltight, my 1960 M 50 is completely oil tight,
One of the best thing I did was to put a reed valve breather on the original breather pipe, to obtain negative pressure in the crankcase,I also machined a grove in the rocker box to enable two 'O' rings to be fitted above the pushrods tubes.
I got fed up trying to seal the chaincase, so fitted a belt drive conversion from the late great Mick Hemings. And after about 10,000 hard miles,no noticeable oil leaks.
Also I don't know why, but it hardly seems to wet sump, even if not ridden for a few months, unlike my Velo, that I had to fit a oil tap (with a switch)
Regards John O
- Log in to post comments
Doesn't Wet Sump.....
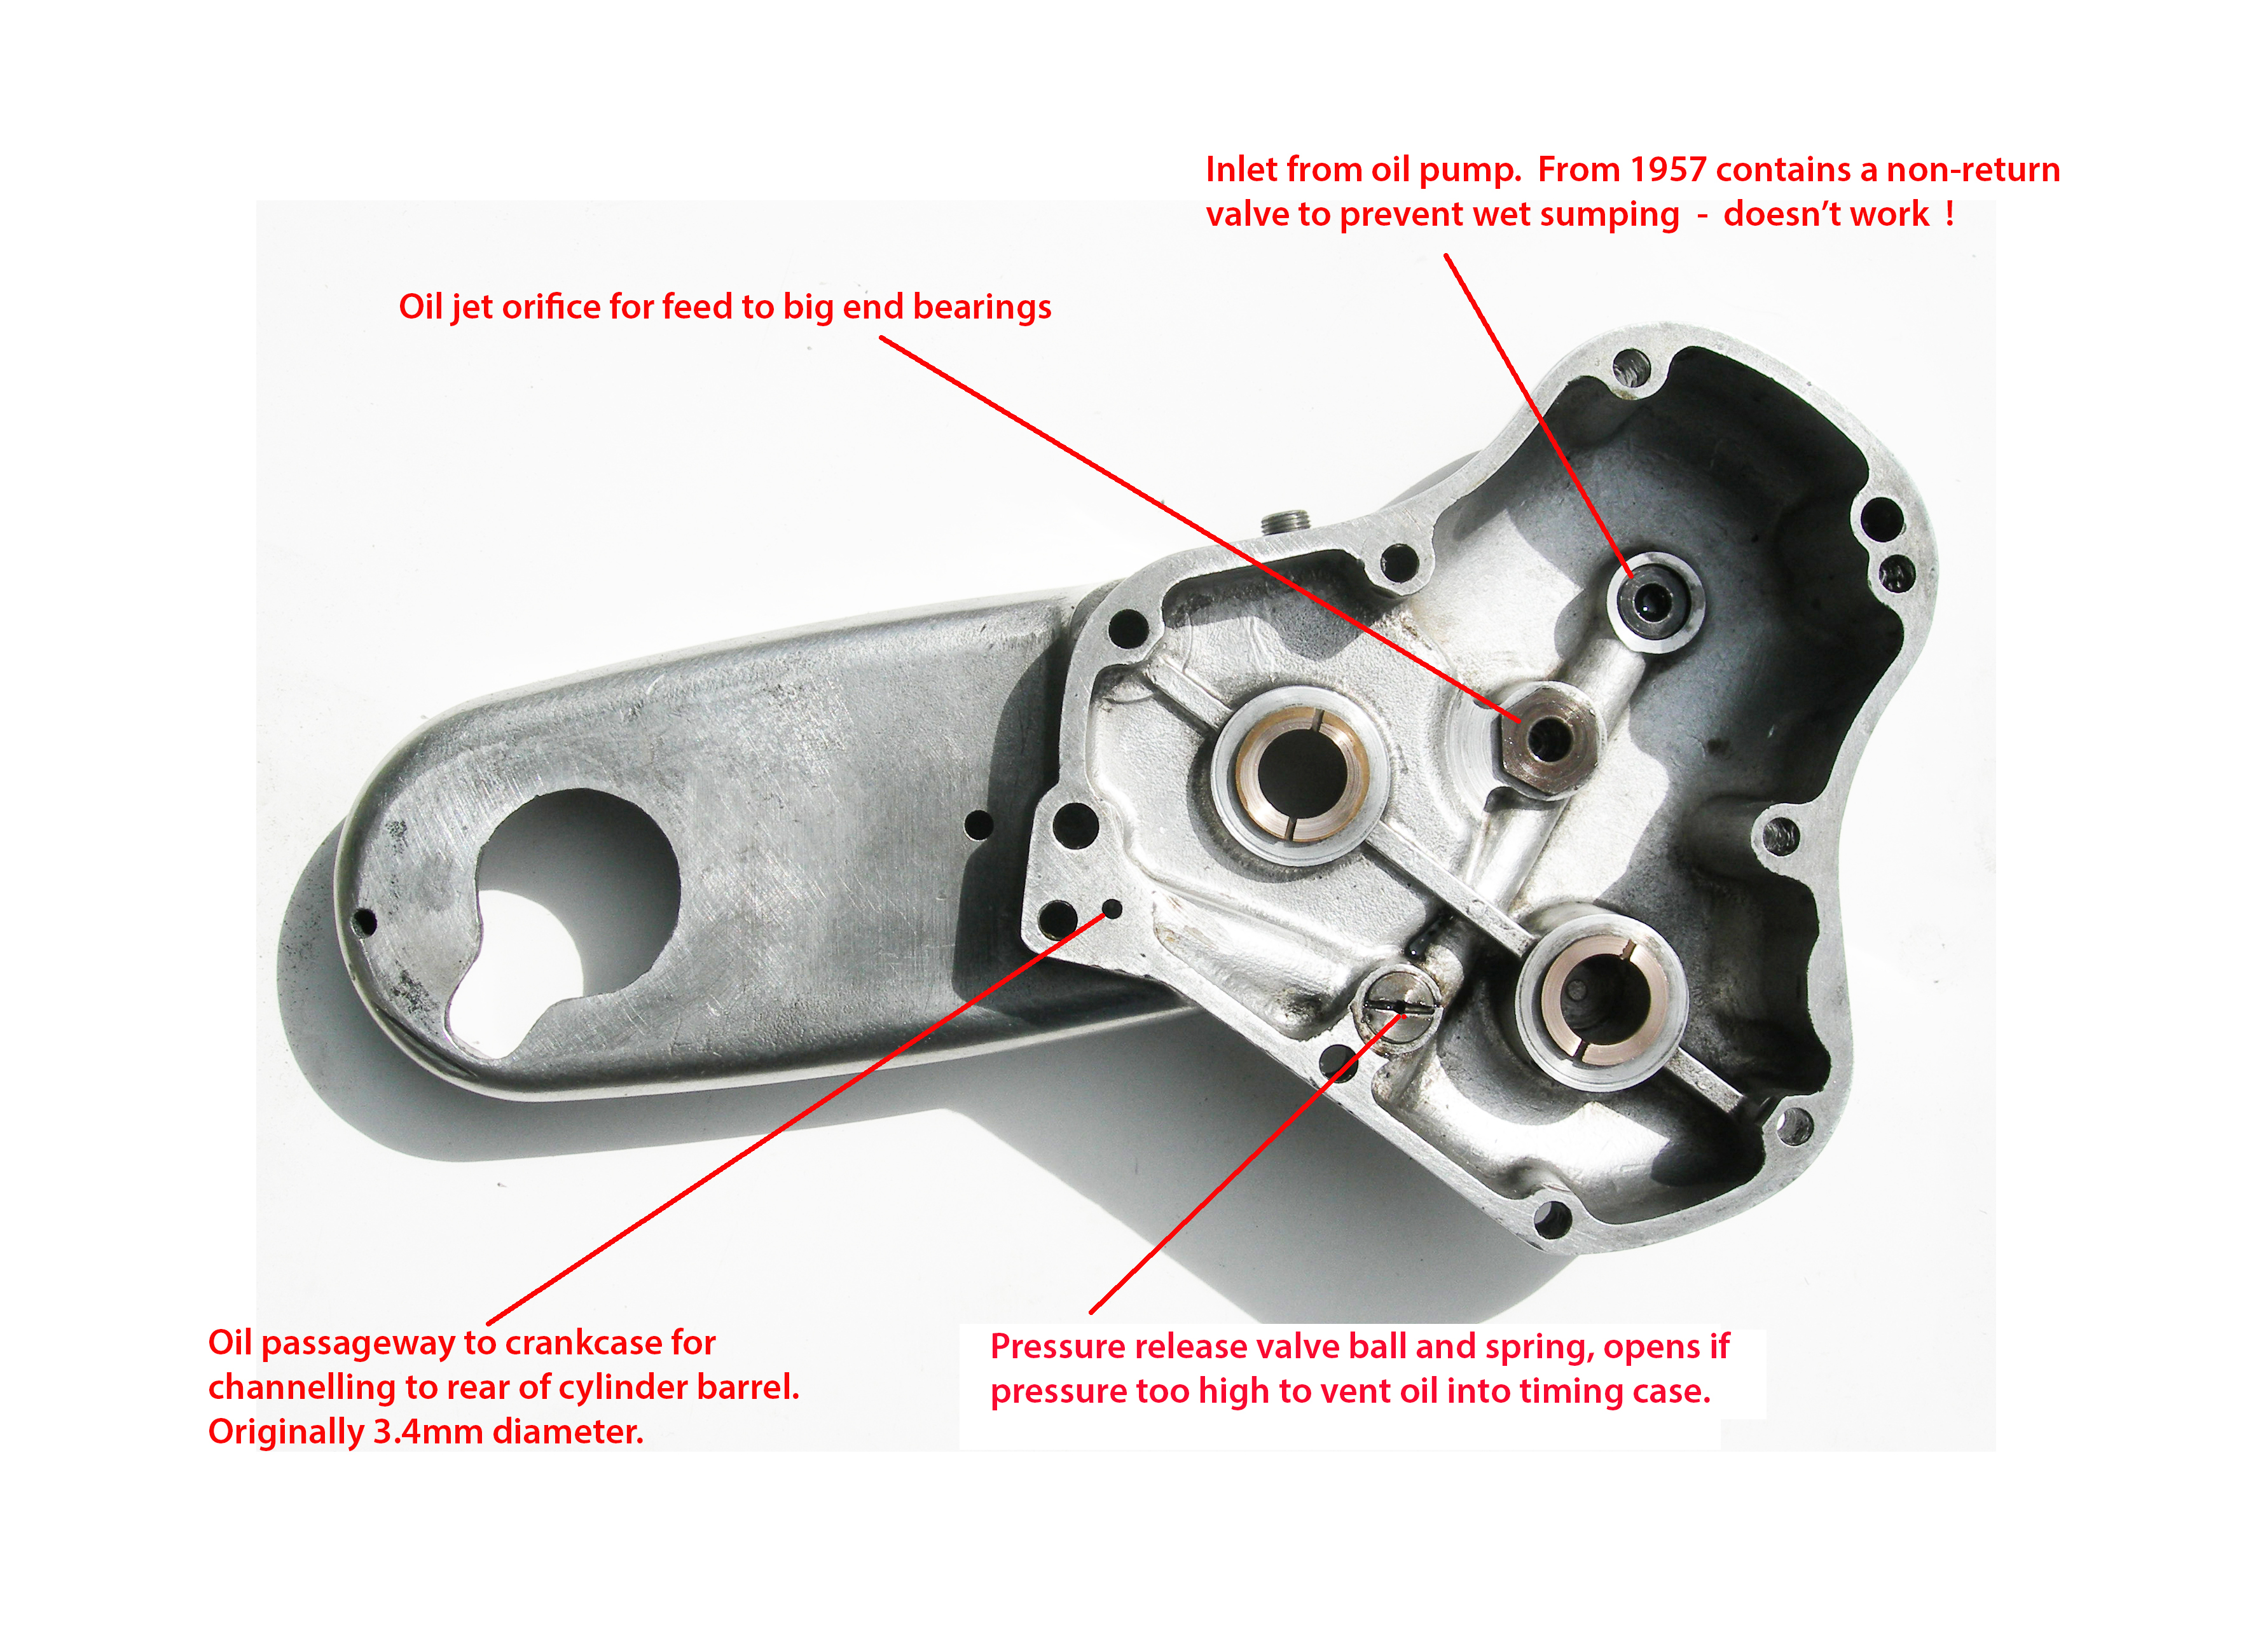
because your built-in anti-sumping valve actually works. I had a '61 ES2 that sat for 5 years in a friend's possession, and it had all its oil where it belonged. I suspect that the problematic valves need some attention and they would work just fine. Nice to have the valve downstream from the pump. These are not my comments in the attached photo.
- Log in to post comments
Crank Case Pressure
Thanks all, John can you give the specifics on your reed valve? Make, model, source? Also can anyone specify the PCV valve they have found works well. I'm in the wilds of rural Washington State and getting parts is slow. Waiting only for an engine to plates stud set to start final and hopefully last build. Very pretty machine!
- Log in to post comments
Crank case pressure
Paul
Very sorry about the long delay in my reply about my reed valve. It was originally from a Beta trial bike I think, but any reed valve would do and hopefully give a slight negative crankcase pressure and help with any oil leaks.
Once again sorry for the long delay.
Regards John O
- Log in to post comments


Paul, TW’s only became part of the mechanics toolkit when fastenings became engineered to a critical tolerance. Your machine has its roots in the steam age. Clamping pressure and “pull out” are what are critical for you. Take a look at the recommended torque for the size of fixings involved and materials employed. Fit, lubrication and finish are all factors on the capacity of a fixing
The usual thing for these machines involves feel and rechecking after heat cycling. By all means check your “feeling” with a TW and record. Studs in alloy with worn or damaged threads may not hold max load for that type of fixing go easy and go evenly across a joint.
Jon