
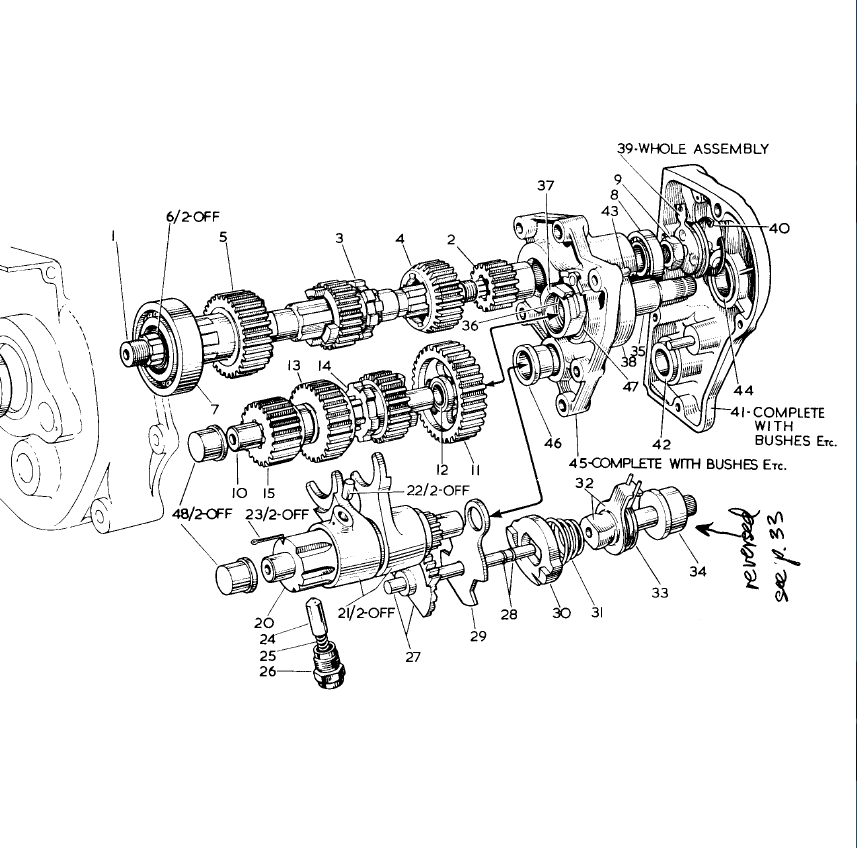
I am currently only able to get two gears when shifting my '65 Electra. Since I'm not sure the gearbox was assembled correctly before I received the bike, I'd like to take everything out of the case and put it back in together properly. While the assembly instructions in the Norton manual are pretty clear, about where each gear goes it doesn't specifically say which striker fork is supposed to engage gear (3) shown in the assembly diagram (fig. 45) and which engages gear (14). I was wondering if anyone had a photo that shows the assembly together outside the case that would show the striker forks in place? Or can someone look at fig. 45 in the manual and tell me where each striker fork goes?
Thanks, Jack.
There’s another fairly…
- Log in to post comments
Dan, I followed that…
Dan,
I followed that thread and did the alignment of the gears, but was still only able to get first and second gear. That's what has led me to suspect there might be a selector fork problem or some other mis-assembly of parts.
- Log in to post comments
Hi Jackhave you discovered…
Hi Jack
have you discovered this when riding or can you only select 2 when it’s sat on the stand/bench. I ask because these gearboxes are difficult to change by hand without everything spinning. Mine is back together now so I can’t have a fiddle, but I think it’s pretty hard to get it together wrongly if you follow the manual. Although it is fiddly getting the selectors to engage in the plate. I had The two shafts and selector shaft off the inner cover and in the gearbox when I assembled mine. I then put the inner cover on and did everything up.
When you say striker forks I presume you mean the selector forks. They are identical and sit on the shaft facing each other. The gears they slot into have a machined slot and are pretty obvious Looking at the diagram, as you say, it looks like gears 3 and 14. When you assemble the gears for the first time don’t have the detent plunger and spring fitted it makes everything a bit easier.
Does that help?!
- Log in to post comments
Dan, I did mean the…
Dan,
I did mean the selector forks, although the manual calls them "striker forks." Also my shifting problems are occurring while riding the bike.
However, I can see by your earlier photo that the nearest fork (when looking into the gearbox) appears to be engaging gear 3rd gear (14 in the figure) on the layshaft and the farther one points upward and appears to engage gear 2nd gear (3) on the mainshaft. This basically answers my question. However, both your forks and the ones in my gearbox seem to be installed in reverse of the pair shown in figure 45. Are the two interchangeable or is the illustration in error - like it is for spacer number 34?
- Log in to post comments
The selectors are…
The selectors are interchangeable but I’m away from my manual at the moment to make a comparison with my photos!
- Log in to post comments
I see what you mean, but…
I see what you mean, I think the problem is that the manual has put the selector shaft in front of the other shafts when it is actually behind. They have used artistic licence to show the gears better. If you move the shaft to the other side the selectors have to rotate and the locating pin moves to the top, if you see what I mean!
- Log in to post comments
Mainshaft thread
As part of my transmission rebuild project I had ordered a new nut for the end of the main shaft under the clutch assembly which was missing when I purchased the bike. In reassembly I now find that the threads on the end of that shaft are damaged and won't allow me to attach the new nut I received.
Anyone have any idea what die I would need to repair these threads? Will this me a Whitworth or metric?
- Log in to post comments
Hi Jack,The clutch centre…
Hi Jack,
The clutch centre retaining nut for an Electra is part number 24570 and is cheaply available from the NOC shop. I have purchased one recently for my late Navigator which shares the same clutch and gearbox mainshaft as an Electra and I can confirm it fits perfectly. The spares catalogue and Norton manual do not give a thread size but the NOC shop shows it as 9/16" 20 tpi but not what thread form although I found one of the slim NOC Whitworth sockets fitted perfectly. However, in my limited knowledge I think 9/16" 20 tpi is a British Standard Cycle (BSC) thread form rather than Whitworth. To be on the safe side I think I would run a 9/16" BSC tap through a new nut first to confirm the thread is correct before risking using a die to restore the difficult and expensive to replace main shaft. I'm not aware of any metric threads on a Lightweight - they were produced long before metrication. I hope that helps but proceed with caution, I am no expert on thread forms and my research may be incorrect!!!
Good luck
Nick
- Log in to post comments
Nick, Thank you very…
Nick,
Thank you very much for your thorough response. I will follow your suggestion and run a tap through a spare nut I have before tampering with the main shaft. Now I have to look at all my taps and dies to see if I have a 9/16 20 tip BSC set. Not an often used standard in the USA.
Jack
- Log in to post comments
Might be worth looking at a…
Might be worth looking at a thread file rather than a die - you can get them in different thread forms and they come with a varying number of (8 sizes I think) tpi on each file. If it’s just the end that’s damaged would be a better bet I think
- Log in to post comments
I had trouble getting a nut…
I had trouble getting a nut to fit, but found the club one solved the problem!
Dan
- Log in to post comments
Hi Jack, Bruce beat me to…
Hi Jack,
Bruce beat me to it, square type thread files have 8 different pitches, 4 at each end and if yours is a cycle thread (BSCy) you just need a UNF file as long as it has 20 TPI, as cycle threads have 60 Deg. thread angle the same as UNF. If you are filing it in situ make sure you stuff rags everywhere to prevent swarfe ingress.
Regards
Richard
- Log in to post comments
Good idea
Another good suggestion. Thanks. Probably impossible to do insitu.
It seems the problems with this gearbox just keep coming. Now when I place the box in neutral, so I can spin the rear wheel, (after lining up the selector marks) then attach the end plate assembly and snug it's five nuts, the wheel will no longer turn. If I ease off the nuts it turns again. What's up with that?
- Log in to post comments
Wise words Bruce, I must get…
Wise words Bruce, I must get a set of BSC thread files - one of those tools which I suspect you never realise how useful they are until you have a set!
Nick
- Log in to post comments
Very very usefull Nick - I…
Very very usefull Nick - I’ve still got my set from the early 80’s when I started with Lansing Bagnall. They’ve been all over the world with me and even survived being stolen when the rest of my tools went, in Western Canada. Can’t remember how many times they’ve got me out of the poo!!
- Log in to post comments
Re can't spin the wheel
Jack, I had this with my Jubilee. If the main shaft is not fully home towards the back of the gearbox when you tighten the end plate nuts that somehow locks up the shaft. It is not easy to ensure the shaft is fully home but a good indication is that the end plate should go all the way back with just hand pressure - without the need to tighten the end plate nuts. If the end plate will not go back all the way wiggle the main shaft until it does, pushing the main shaft towards the clutch side as you do that. Worked for me.
Dennis
- Log in to post comments
Main shaft
Great suggestion Dennis. My end plate slides on smoothly and appears to be all the way on but I double check it this morning.
I thought about getting some correct size Whitworth nyloc nuts and snugging them down enough to hold the end plate in place but not tightened so tight the wheel quits moving. This would keep me from worrying about the original nuts vibrating off if I left them a little slack.
- Log in to post comments
Cam Drive Plunger
I noticed some discussion of the cam drum plunger in the earlier thread. What exactly does it do?
- Log in to post comments
Sorry, guys - I've come late…
Sorry, guys - I've come late to this thread - been away from my desk since before Xmas.
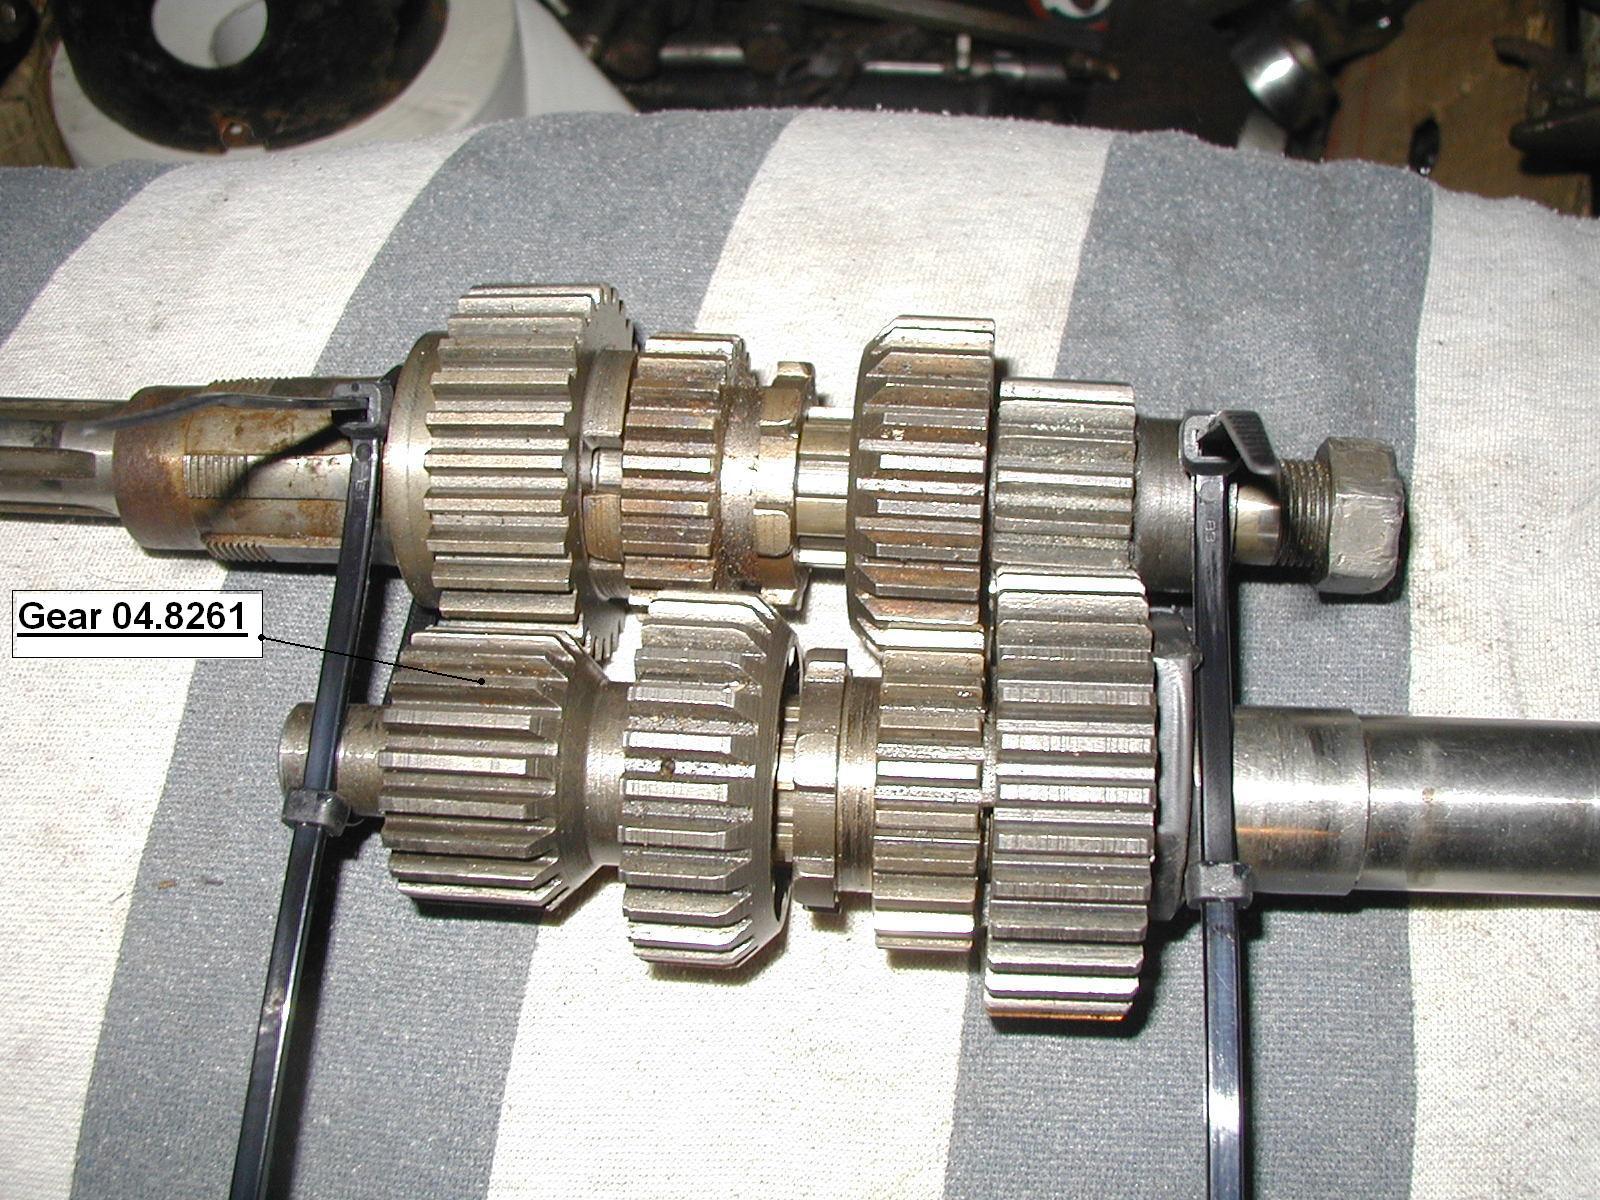
The thread started with how to assemble this gearbox, and is there a picture of it outside the gearbox. The timing thing, as explained in the first two pictures is important. There is a mark on the drum (20 on Plate G) as shown on the lower pic above, and a mark on the ratchet plate (27 on Plate G) - visible in the first picture above. Plate G refers to the Parts List.
Instruction 52, 2nd Line (in the Electra Manual) tells you to line these up.
If you are using the Twins manual, then on page 45 "The Footchange assembly" explains
The two selector forks (21 on Plate G) are identical. The two grooves they sit in can be plainly seen.
- Log in to post comments


There’s another fairly recent thread on this, I expect the marks on the selector have not been lines up correctly. You have to take the cover plate off so it can line up. I’ll look for the thread.
I'm pretty sure the selector forks are identical and will only go in one way?
Thread here: https://www.nortonownersclub.org/node/9762
dan