
Since I rebuilt (partially) my Electra I've had trouble with the electric start. It hasn't been with the mechanical side (although more later). But the electrical side has been causing me grief. I've had long conversations with Boyer - the problem has been that the bike rarely starts hot or cold. The starter has been whizzing the engine over smartly but only firing when I release the button. I have Boyer Mk 4 fitted which is supposed to work down to 7 volts and am seeing 10.1 - 10.4 available when cranking. Following Boyer's advice I have fitted 2 new 6 volt coils instead of the original 12 volt versions. These have made no more than a slight improvement - what I do see is that current draw when switched on is now 4 amps rather than the 2 or so I saw previously. Obviously this drops back to zero after a few seconds. The only way I can get a reliable start is to hook up a second 12 volt battery feeding just the ignition system which does start reliably on the button. I do have a cunning plan to rectify this. Anyway I digress.
As will be apparent, I've been giving the starter something of a hard time during this period - probably equivalent to years of normal use - and have had several backfires. This morning for the first time I had the dreaded whine as the clutch failed to engage. On stripping it I've found one of the pawl engagement pins broken and lying in the bottom, and all pawls burred on the engagement side. The only good news is that the driving sprocket, which I fitted after grinding in the tapers and omitting the key, has stayed attached!
I've read all the contributions here which have been invaluable and intend to replace the broken pin with a 4mm drill shaft. However, I can't see a way of cleaning the pawl faces up without removing the pawls which would involve grinding the riveted end of the pawl pivot pin(s) off - am I correct in thinking this, and how have people replaced these?
It's quite depressing as I've had several good - although short - rides on the bike and really like it. But it's starting (pun not intended) to try my patience.....
I would advocate using the…
- Log in to post comments
I've made...
... a new pin out of a 4mm HSS drill which should, I think be tough enough. I accept plain carbon steel may be less suitable. I do wonder whether the pins I already had - installed by a previous owner - were strong enough but they have stood up to considerable pounding!
I think I'll just clean up the pawls with a small stone in the Dremel and see how I go with that.
- Log in to post comments
Some sucess
I used the 4mm shank of a drill many 'starts' ago and it is still ok. Silver steel was far too soft.
The pawls I inherited were very 'rounded' I had them stick welded with a steel that was intended for impact. I then reshaped the pawls on the grinder, seems to have worked well enough.
My MKIII Boyer starts ok especially when cold, but when the engine is hot the washer in the sprag misses!!
- Log in to post comments
All back together...
... but will postpone any testing till tomorrow giving the loctite on the crank bolt time to set.
I am convinced the reluctance to start is down to the BB box not getting enough voltage and am starting to suspect the battery. I'm charging an old car battery in the shed and if it takes charge will try that with jumper leads.
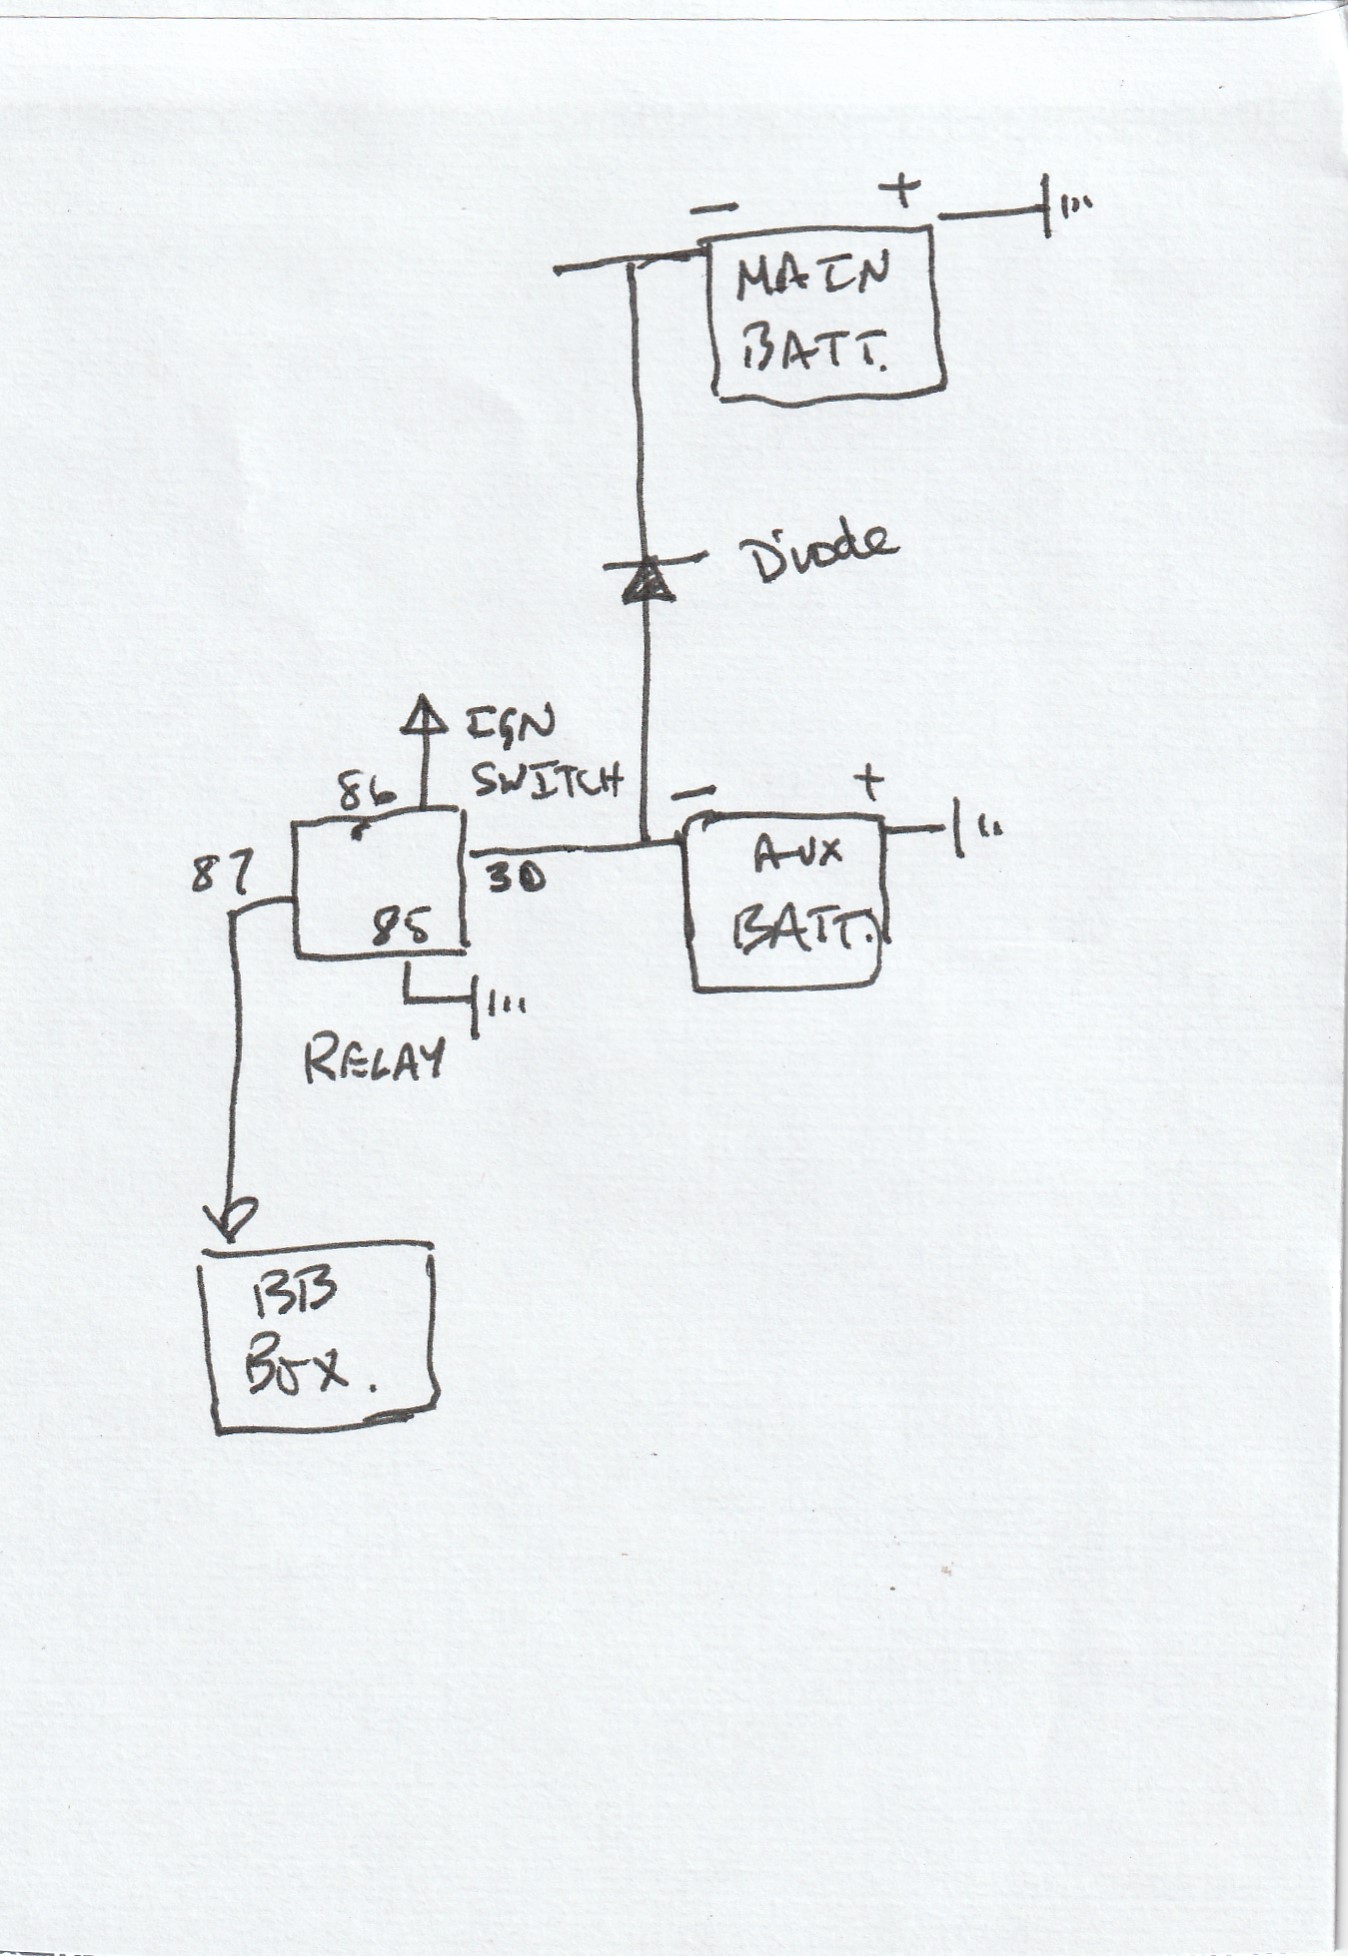
My current proposed solution - which may be a non-starter - is to fit a small 12V battery dedicated to the BB box. This will be activated by a relay switched by the ignition switch and charged via a diode (if I can remember which way round to put it!) so that it doesn't try to contribute to the starter motor load.
All good fun eh? At least I have the B'Zuki which is turning out to be a nice bike to ride.
- Log in to post comments
All screwed back together...
... and the mechanical side is working fine. The old car battery was a non-starter(!) as it wouldn't hold charge so would be worse than useless.
It still wouldn't start off the main battery although turning over briskly. It did start using the auxiliary one. So I'll buy a little sealed item and connect it up. This is what I'm thinking. The diode (which I may have drawn in the wrong direction!) is to allow the auxiliary battery to be charged but preventing it being drained on starting.
- Log in to post comments
Out of interest where are…
Out of interest where are you measuring your voltage - Have you measured how much voltage the Boyer box is getting, are you losing power along the way?
- Log in to post comments
Measuring voltage when cranking...
... across the battery terminals which is where I get the 10+ volts. I've also measured it at the ignition wire (white) going into the BB box and this is the same as the voltage across the battery give 0.1v or so. Static volts with acharged battery are 12.7 in both places. I'm convinced that whatever Boyer say it's not working effectively at this voltage.
I've ordered a battery from Tayna and will wire it all up tomorrow, probably omitting the charging connection till I've proved (or not) that it works.
- Log in to post comments
Where do you live Ian,…
Where do you live Ian, swapping the Boyer with someone who has one that you know works ok would prove the point, I'm no electrician but have you tested the voltage at the Boyer box as the engine is cranked by the starter? I'm in Devon if it helps and you are welcome to borrow mine from my jubilee
- Log in to post comments
AH BUT.....
Aha but measuring this BB supply voltage, at 12.7V with respect to what? the earth terminal of the battery? I would guess. But is the earth terminal of the BB at the same potential? The voltage drop you are looking for might be in the earth circuit?
Good stuff this electricity!
- Log in to post comments
Many thanks
for continued interest. Re where I'm measuring voltage: it's the same at battery terminal and engine. I've used 10 sqmm heavy duty cable for both earth connection and live (negative) starter connection.
Many thanks for offer Dan but I'm in Redditch. The bike came with a Mk3 Boyer system which is known to give problems at low voltages so I've replaced that with a new Mk 4 box direct from BB. The PCB and rotor are as original but BB assure me they should work OK with the Mk 4 box. Resistance across both coils on the PCB is 138 which is in line with BB recommendations. I've replaced all those horrible pre-insulated connectors with properly soldered ones.
As you say Al, electricity is good stuff. I have a wild theory at the back of my mind that because I have used the heavy duty cable for starter and earth connectors that this allows the starter to grab all the available power leaving little for ignition. Totally daft probably.
What do you think about my idea in the sketch? I've ordered a 4.5AH battery from Tayna to try it out. I'm not sure if the diode will achieve what I want - it should probably be a split charge relay.
- Log in to post comments
Hello Ian, I'm going to…
Hello Ian,
I'm going to stick my head above the parapet and answer your question. But at the same time give you more to think about.
You are on the right lines with your little battery and diode thinking. Just some other things to consider like the current rating of the diode. I doubt something like a little IN4002 would handle the potential charging current and any surges, so something 20 amps or more such as RS components 238-4732. Mount it on a small heatsink which MUST be electrically isolated from the bike frame, or something will go bang and all the smoke will get let out of the battery.
And, as I'm not familiar with your bike, is the ignition switch feed separate from the lighting switch feed such that your two battery lives don't get crossed up?
Regards
Duncan.
- Log in to post comments
Listen up
The BB pickup cannot affect the low voltage issue with starting. You have measured the Battery voltage at the battery and it drops when starter engaged-fine. but you must measure the actual voltage that is supplied to the BB at the two wires that feed the BB. With regard the aux BB starter battery circuit as above, there is no provision for running after the starter has finished its business.
Duncan-at this point in the exercise the recharging of the Aux is not an issue, what is an issue is does the idea work? More anon.
- Log in to post comments
Thanks again both.
Duncan: I've found a split charge relay for a tenner that should work better than the diode, however as Al says the current(!) problem is verifying that the ignition side works. https://www.carsparesltd.com/product/towing-trailers-b5350/dual-charge-rely-COMMP288/COMMP28
That device is negative earth but I should be able to use it to drive (yet another) relay to bring in the auxiliary battery when the system is charging ie the voltage across the main battery is above 13.5 or so. It may need its threshold tweaking a little.
Al: I have measured the voltage both at battery and BB feed (in the original configuration) and both are the same at just over 10 volts. My configuration is intended to completely isolate the ignition system - apart from the earth - from the main bike system. I haven't shown all the connections in my diagram but the BB white wire (negative) will be fed from the auxiliary battery via the relay so will be permanently live when the relay is closed. Other connections will stay as standard. I measured the coil resistance just for elimination purposes.
The auxiliary battery is due to arrive this afternoon......
Of course I may be barking up entirely the wrong tree and find the problem is carburation.......
- Log in to post comments
Well...
... the battery arrived (great service from Tayna as always), I gave it a quick refresher charge and fitted it. Reslt: The bike started easily after a few revolutions and seemed to run well. I'm reluctant to keep trying it at the moment but feel as if I'm getting somewhere.
I've bought the split charge device and will fit that when I've recovered from the heat.
- Log in to post comments
Whats inside the split charge relay?
Without a schematic of what's inside the split charge relay it's not possible to ascertain if it will work as you require or not. I suspect that the internal circuitry will not include a diode or similar device and when you switch the ignition on, both batteries will be connected together, and thus not work separately as you intended.
Just my thoughts...
Duncan.
- Log in to post comments
The starter motor?
I've been reading this topic with interest, an Electra may be the bike for me when the legs get too feeble to use a kickstart!
Could the problem be with the starter motor? Assuming its the original then it will be around 60 years old. Could it have deteriorated? There's plenty that could be "below par".
Finding an as new Lucas M3(?) to try may well be difficult so how about fitting a modern permanent magnet motor? Might be difficult, but not impossible, to graft the gearbox from the Lucas motor on to another motor. Perhaps there is a PMDC motor with a suitable gearbox? A modern motor would be less demanding on the batteries.
I also read plenty on failed starter components, failed and worn pawls etc. Has anyone fitted a sprag clutch, replacing the ratchet and pawla? That is to say, modernise the system.
- Log in to post comments
split charge relay
I've read up a bit on these and it looks like most have a voltage sensing arrangement which will then connect the Aux battery to charging once the main battery is above a preset voltage.
Go for it Ian. I reckon it will work.
Duncan.
- Log in to post comments
Split charge relay.
As Duncan says, these devices are designed to connect a secondary battery when the input voltage exceeds a predetermined level - preset to 13.5 volts in this case - and to disconnect when it drops below another level - 13.2 volts. This is precisely what I need. This layout is designed for motorhomes etc and is used for the same reason - to charge the auxiliary (leisure) battery but preventing it from contributing to the starter. Obviously this relies on the charging system (full wave rectifier plus Zener diode in my case) providing that level. There is an adjusting screw so I may have to tweak the cut-in value a bit.
John: I'm quite happy with the performance of the starter motor - it turns the engine over readily. As you say there are well known weak points in the sprag / transmission but not insuperable. I think it would be a major engineering job to fit any other sprag system. I think Peter Holland has fitted an alternative motor.
I remain convinced that the problem I have is that the BB system is not receiving enough power when the starter is running. I've been talking to BB who have been quite helpful. However, the system was designed for bikes with kickstarts. In their own words: "Although the MK4 box can operate at lower voltages, power will still remain very low". It may well be the case that there are other contributory factors - I haven't checked compression for instance, but it seems quite low on kickstarting. I've rebuilt the carb and once running carburation is clean and the engine runs well.
This is a rough schematic of what I propose. Note I've added a 10 amp fuse in the auxiliary battery output.. On the VSR, terminal 12 is positive input, 6 is positive switched output and 0 is negative. Fortunately the whole lot is in a plastic box so no worries about the chassis being earthed etc.

- Log in to post comments
OK...
... all connected up as in diagrams and tested. It works just as I hoped it would. Starts readily - albeit after a bit of churning over - and runs well although at the moment still a static test. The charging system is also working - I temporarily included an LED to show when the auxiliary battery was getting charge and that showed it was at everything over a fast idle. Of course it needs a road test and some time to show that it's a permanent solution.
A thought has just struck me - the same charging circuit could substitute for the warning light assimilator with a couple of minor adjustments - particularly replacing the N/O relay with a N/C one.
- Log in to post comments
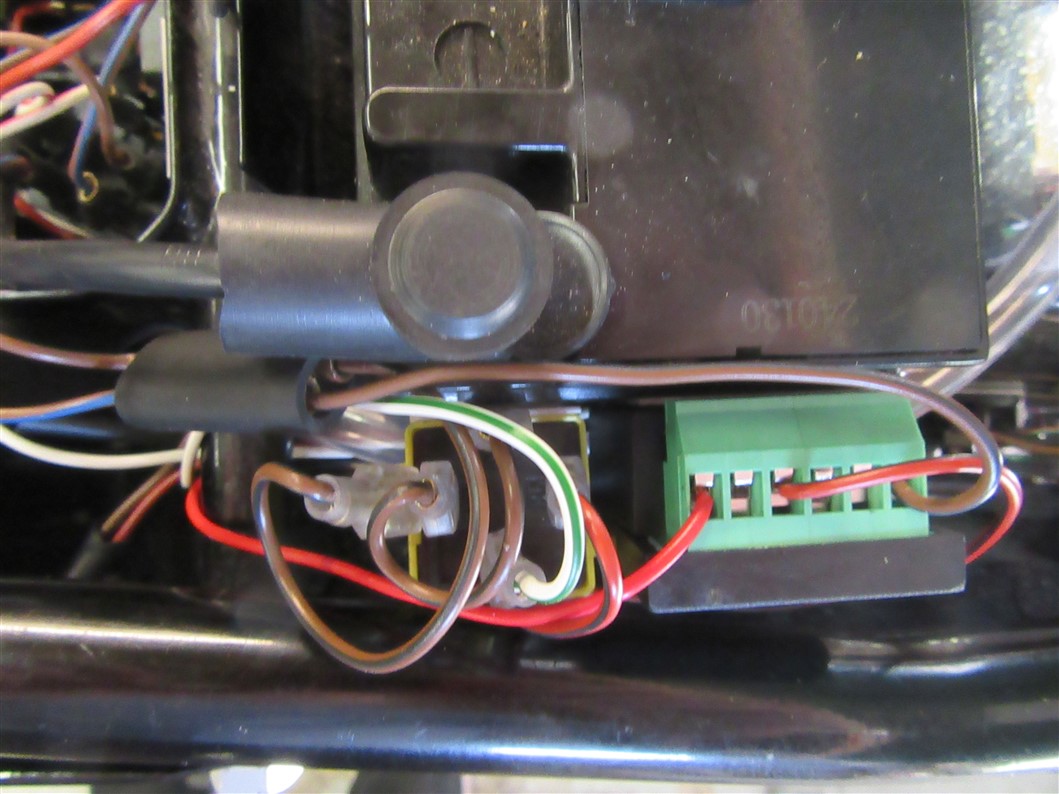
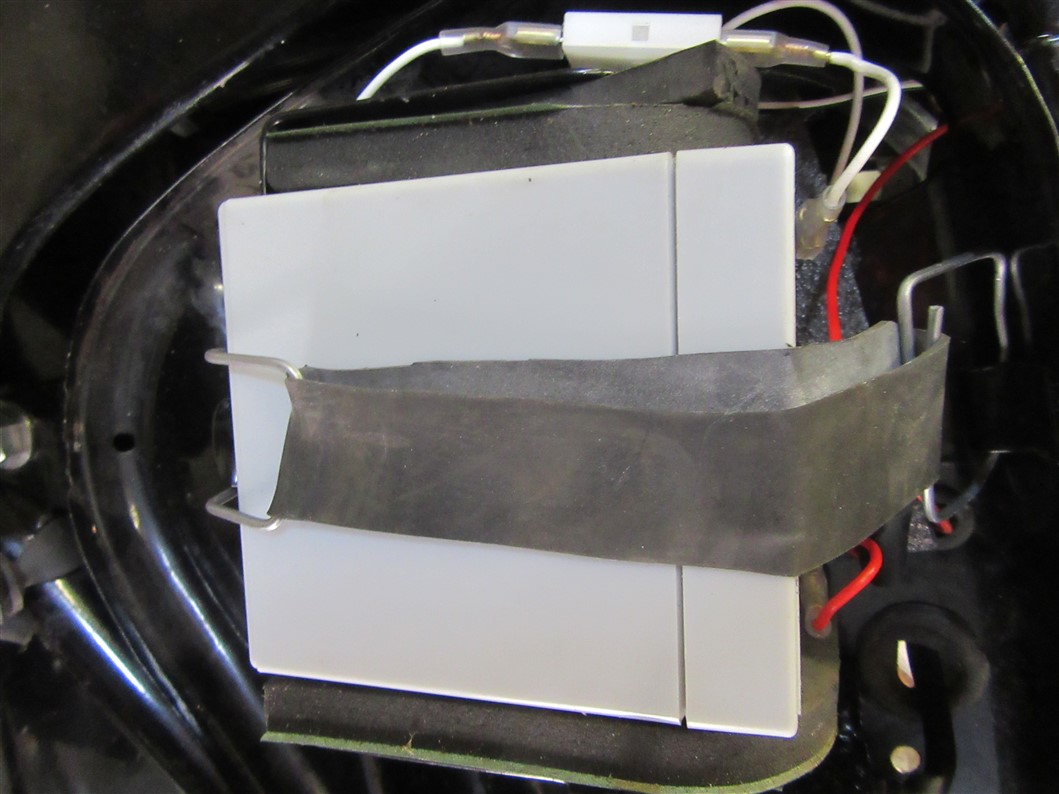
Some pictures...
... of the installation. Note, if it all failed then it's a simple matter to just reconnect the white ignition wire to the white on the BB box which will omit all the stuff I've added.
Relay and BB box:

Voltage sensitive relay and charging relay:
Auxiliary battery installation:
- Log in to post comments
Sorry to return to this yet again...
... but the drive has failed again. The silver steel pin has bent! So I have now tried 4mm drill shank and silver steel. I've asked on a model engineering forum and there are 2 suggestions: hardened and ground dowel pins and piano wire. I'm quite attracted by the former as they arrive in exactly the right size.
I've also noticed that there seems to be a huge amount of play on the pawl pivot pins. I was hoping not to have to do anything with them but this can't be helping anything. Plus the pawls are now showing significant wear so I'll try the weld repair suggested by either Al or Andy.
I have to say it's getting me down, and the hot humid weather doesn't help.
- Log in to post comments
Stick with it...
you will get there in the end.
I think that after you have corrected any wear in the adjacent components the best way forward with the pins would be to use 10.9 or 12.9 (metric M5 or 6) bolts as the source of decent material capable of doing the job. These can then be machined to fit properly, important if a ratchet mechanism is to function reliably.
- Log in to post comments
I did say....
I did say some time ago that I tried and it failed Silver steel. I then have used the 4mm drill shank. Funny that Norton/AMC were using mm in 1960s. By the way my Boyer Bransden ignition on the Electra fires up without the extra battery. All I have done is bypass the original ignition switch and ammeter with a toggle switch. The Sprag also doesn't work when hot!!
- Log in to post comments
Thanks again (and again...)
I've now dismantled the whole thing, grinding the peened part of the pivot pins and driving them out. One of the pawls (actually not the one with the offending drive pin) is very badly worn. It makes me wonder whether that pawl has not been engaging but has been riding on the ratchet.
The pivot pins are worn giving a lot of play. Interestingly, even the unworn portions are significantly smaller diameter than the pivot holes in the pawls. This seems to indicate that a certain amount of "slop" is built in although I can't see why that would be a good thing as amongst other things it would let the pawls cant over. Maybe it's to allow them to find their own position?. The holes in the pawls allow a 5mm drill shaft to fit easily. Logic says that I should open up the holes in the main component to 5mm but I have been wrong many times with this bike.
I plan to have the pawls built up with weld - hopefully I can find someone locally to do this - then file back to the correct profile.
What is ironic is that I had it starting and running well earlier in the year but seem to be going backwards...... But I'm sure I will get there eventually.
- Log in to post comments
Starter Pawls
Ian,
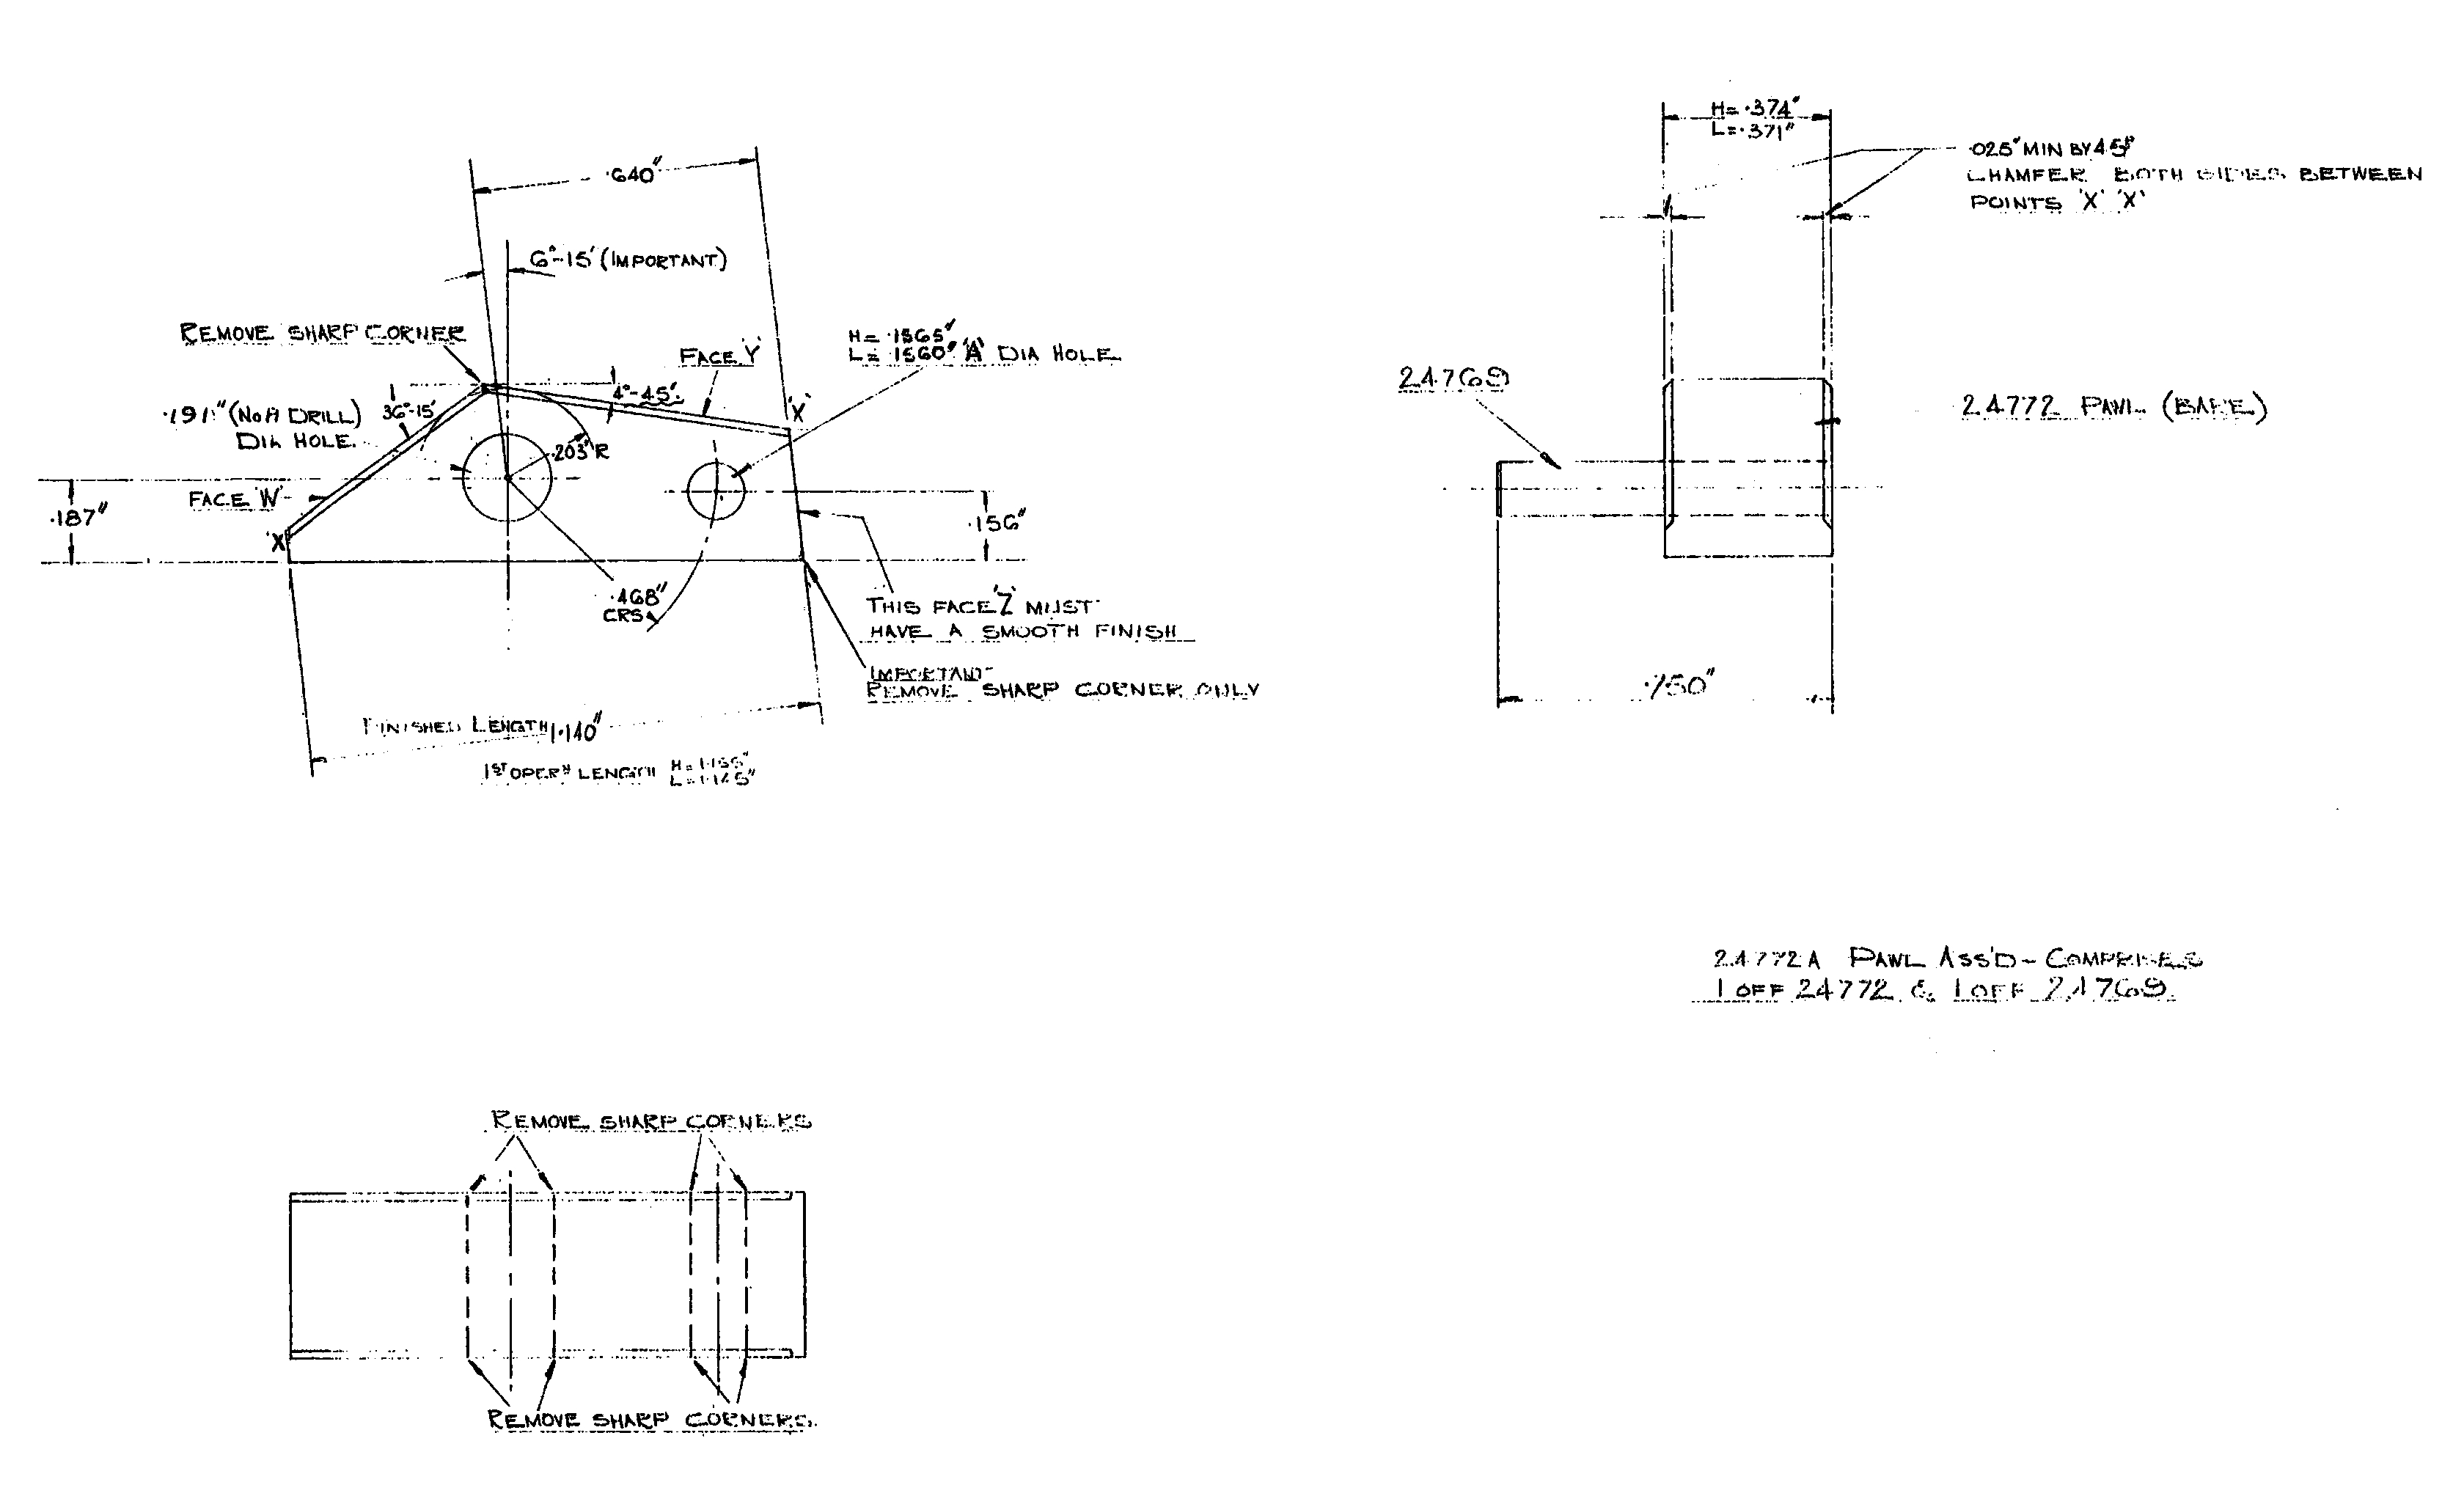
On the AO Services website, in section Data Sheets, there is a very good engineering drawing of the Electra starter pawl.
it would be worth you checking that your pawls have the correct holes, in the correct places. Also, at the first sign of damaged driving faces, it is very tempting to grind the leading face back to improve things.
Your pawls may already have been in the hands of a grinder/improver, so are short.
From the drawing on AO website you could get a set made in a tough modern material. Perhaps John C could advise.
Peter
- Log in to post comments
Thanks Peter.
I have a copy of the drawing and will check dimensions. I've already looked at the hole sizes which correspond to those in the drawing. I've just tried drawing a file across a pawl and it appears they are at least case hardened although when I try on the worn portion the file marks it. There are no apparent wear marks on the ratchet attached to the crankshaft.
I'm still puzzled that the large hole in the pawls (for the pivot pin) is so much larger than the pin size - 0.202" as opposed to 0.184" (on an unworn section). Seems a huge discrepancy and can only add to misalignments.
- Log in to post comments
Some questions/thoughts
Have all the (silver steel?) pins bent? or just 1 or 2?
Is the ratchet worn? I would suggest correcting any wear/damage in that first.
Filing the "welded" pawls will not be satisfactory, the pawls will be very accurately made components, as near identical as possible so each pawl carries an equal share of the load. Its a pity the drawing on the AO site doesn't have more tolerances to reflect the accuracy needed. This is why I suggest carefully checking the ratchet and correcting any wear/damage first.
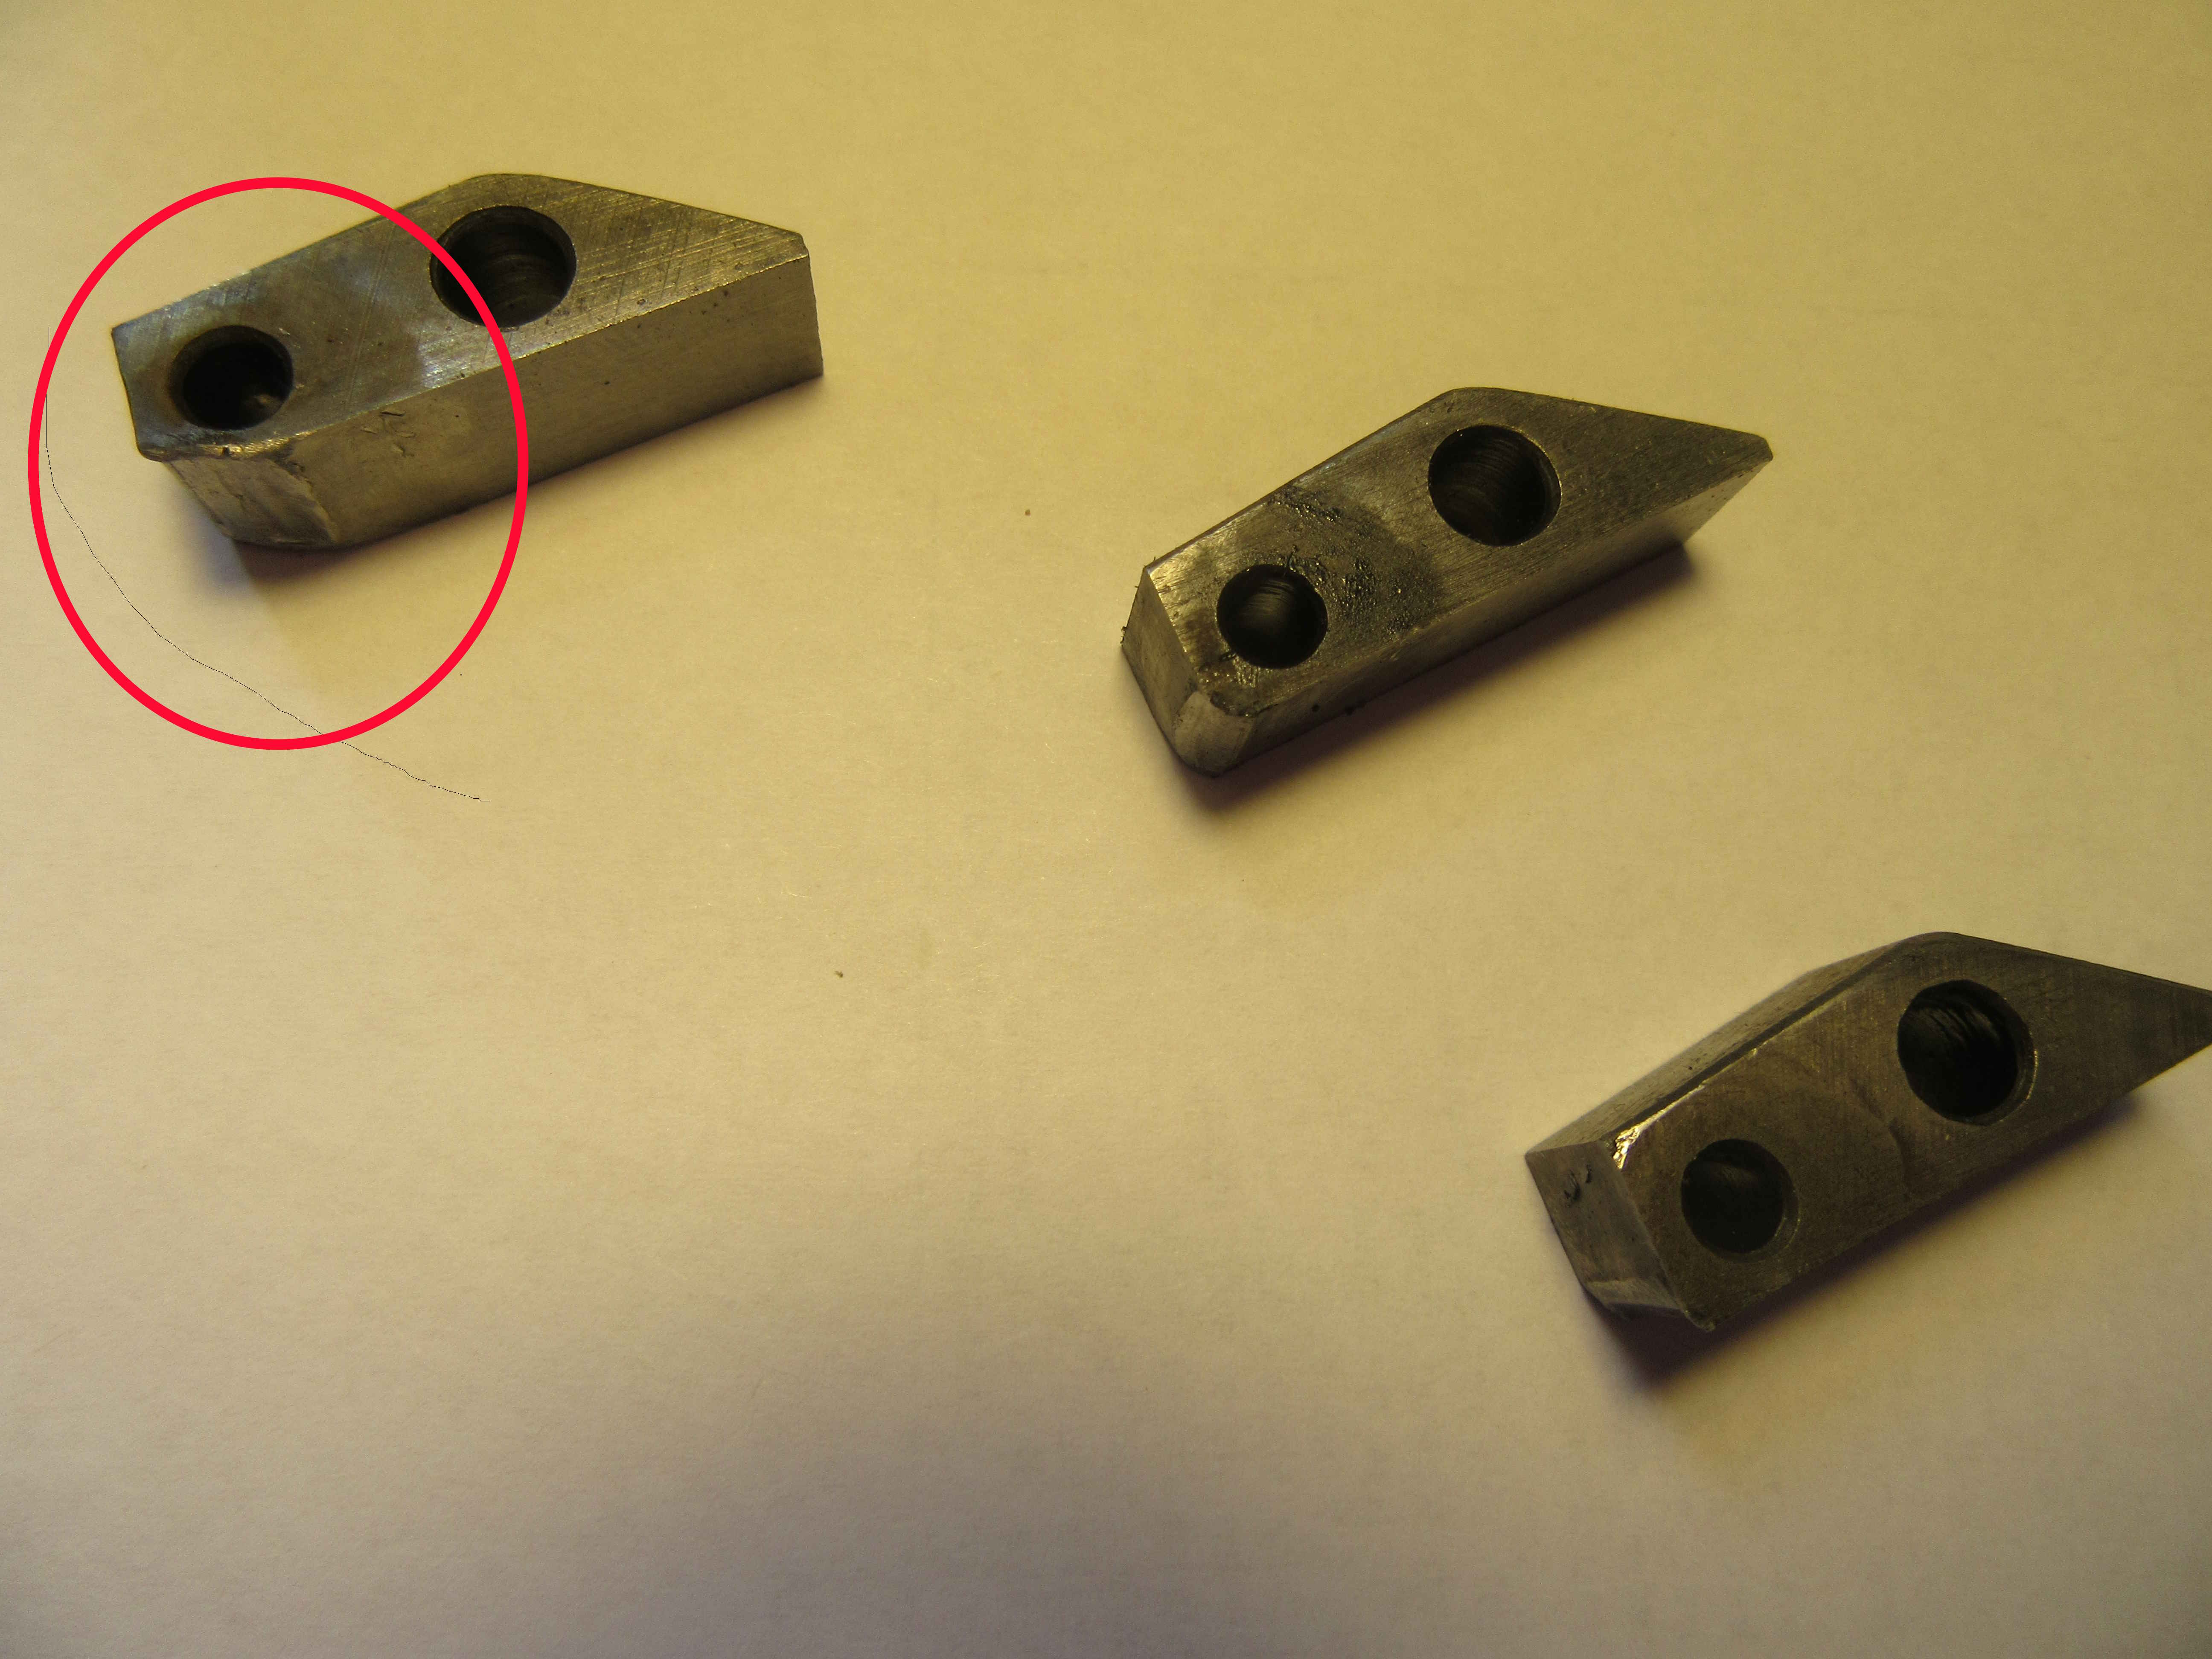
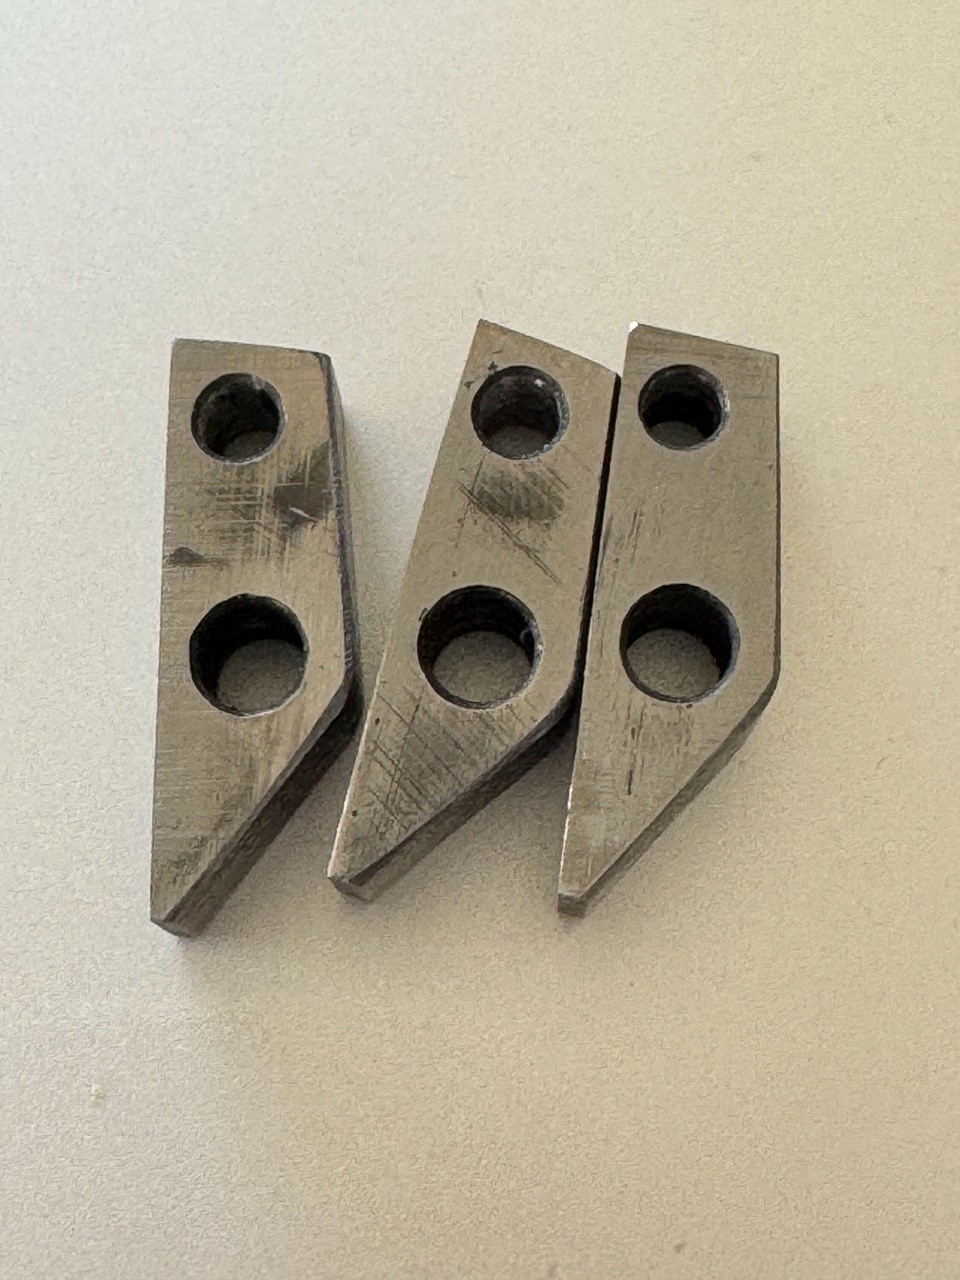
Looking at the photo of the pawls, they are worn out, new ones are needed. Gauge plate should be okay. Again, great care needed in making, they must be all the same, exactly.
Don't mess about with the soft end of a drill or silver steel for the pivots, use high tensile metric bolts as a source of "strong" steel, cheap and readily available.
This all sounds a bit of a faff. I think it the best way forward to get the reliability wanted.
- Log in to post comments
My Electra
On my Electra the silver steel pins bent straight away, my 4mm drill shanks are hard and are still working several years later along with the welded ratchets which I reground 'by eye'.
I can confirm the 5mm hole in the ratchet is fitted with a 4.7mm pin seems to work.
- Log in to post comments
Many thanks John.
This is proving something of a trial but I'm sure it will be sorted out eventually. I agree the pawls are worn out however new ones aren't available and my fitting skills are inadequate to make new ones. I'm off to a local engineering firm (Nametab- hope they're still in operation) this morning to seek advice. I am considering whether metal spraying may be a route to recondition the pawls. Alternatively they may be able to make them although I suspect the cost would be prohibitive especially as they're such an odd shape.
Interestingly the badly worn pawl is not the one that has been causing me trouble - I've only been changing the pin in the one that's broken / bent. I can see that when that happens that pawl is not going to engage with the ratchet correctly and may ride over it thus increasing load on the others. There are no signs of wear / damage on the ratchet itself.
I still can't fathom why the pivot pins are so much smaller than the holes in the pawls with about .015" clearance. This can't help in getting them all to share the load unless I'm missing something. Not unusual......
- Log in to post comments
To move this bike problem…
To move this bike problem along you have all of the answers in this forum to consider, all are doable. To me the least expensive route would be to do what Al Osborn suggests DIY.
Have the pawls welded reprofiled and then hardened for longevity of use.
I have no idea as to what your facilities are but just apply yourself to do what you can and find out who can do the rest.
Simples!!
Rgds.
- Log in to post comments
I've found someone..
.. via the Model Engineer forum who can metal spray with a suitable material so will be sending the pawls off to him tomorrow. Unfortunately my wife's just been taken to hospital with a dislocated (replacement) hip so other activity paused for the moment - not to mention the heat! Other people there have recommended hardened and ground dowels for the actuating pins - these are readily available.
I do agree that the response here has been excellent as always. Even if sometimes contradictory!
I still can't fathom why the pivot pins are so slack in the pawls though.
- Log in to post comments
Watching with interest....
I would have offered to have your ratchets re-welded for you Ian but the chap who did mine has long gone on to other jobs/work. Will watch with interest the metal spraying business. A thought about the slack pins, could it be to make sure the pawls fly out as soon as it turns, you don't want any thought of dirt/oil holding them back and ensure they 'square up' as soon as they engage.
Hope the wife gets well very soon.
- Log in to post comments
Thanks Al,
hopefully my wife will be back home today. She had a hip replaced early last year but has had several dislocations since and will probably need a revision which is a shame. I had a similar op a couple of years previously (same surgeon, same robotic assisted method) and mine has been absolutely fine.
Yes, you may be right about allowing the pawls to effectively find their own position but it does seem a bit crude. I'll get dowel pins for those pivot pins as well. As they're hard I may just glue them in with JB weld as there's nothing to make them come out as far as I can see - no axial loads.
- Log in to post comments
Oh by the way...
... I've converted the pdf drawing of the pawl to jpeg and increased the contrast so it's readable (for my metal spraying chap). Al may want to put it on his website:
- Log in to post comments
Great job blowing those…
Great job blowing those drawings up and making them easier to read Ian. I wonder if Peter Holland thinks it would be cost effective for the club to have a new high quality batch manufactured for sale through the NOC system? I for one would invest in a set of three to replace my originals which still work but are showing clear signs of 50 years of hard work and abuse!
Good luck with the metal spraying solution - I will be very interested to hear the results!
Nick
- Log in to post comments
This is not...
... going to beat me.
On further inspection the outer edges of the starter ratchet are slightly rounded although I can't se that would make a huge difference although if the pawls are only starting to engage this might be enough to allow them to slide over. Further, the bush inside the sprocket is quite worn giving a lot of side play which would not help engagement especially when added to the built-in play on the pawl pivot pins. The NOC stocks both ratchet and sprocket so I'll go for them to try and remove any confounding factors.
I've also been looking at the remains of the broken engagement pin. It's clear that this was case hardened as there's a distinct difference in colour / texture between the pin outer layer - perhaps .010" thick - and the inner core.
I've just sent off the pawls so am hoping for a good result there. The retired gunsmith seems to know his stuff in this area at least although his politics seem to be a bit to the right of Genghis Khan...... Fortunately I didn't manage to annoy him.
Wife still in hospital although hopefully back today. We'll see.
- Log in to post comments
My retired gunmaker...
... has finished with my pawls. They look good although the devil will be in the detail particularly the fit of the driving pin.
This them built up:

And this after finishing. Fingers crossed.......
- Log in to post comments
Pawl guide pin
Hi Ian,
Consider using roll pins in the smaller guide pin holes. Hardened spring material and tolerant of distorted holes. Maybe put slot towards larger pin.
Works on mine.
Check works smoothly in slot of wave washer.
Peter
- Log in to post comments
Thanks Peter.
I intend to use hardened and ground dowel pins as advised by several people on the engineering forum although roll pins might be another option. I'll see what the fit is like when I get the pawls back. If I feel they're too slack a drop of bearing fit should help. The wave washer is in good condition.
I have been using my time constructively and have bought a new ratchet and sprocket from the NOC at reasonable prices - unlike the pawl pivot pins which are a cool £15 or so each! The edges of the ratchet are noticeably sharp unlike the old ones which were rounded. And the new bush in the sprocket gives far less play than the old one. These should help in ensuring that the pawls engage.
I surmise that the badly damaged pawl was due to its pin breaking / bending causing it to ride up over the ratchet teeth. Carelessly I omitted to note whether it was that pin that was causing me trouble. Of course there should be no substantial load on the pins as they only serve to engage the pawls in the ratchet after which it's the pawl interacting with the ratchet that drives the engine.
I think someone suggested that these pawls may be a candidate for remanufacturing although I suspect cost may be prohibitive. I would envisage profiling a reasonable long bar then parting the individual pawls off and drilling. My gunmaker friend said he thought the original material was just case hardened mild steel.
- Log in to post comments
By the way....
my new pal made a drawing - in case, as he said, it all went wrong. It adds some detail, especially angles,
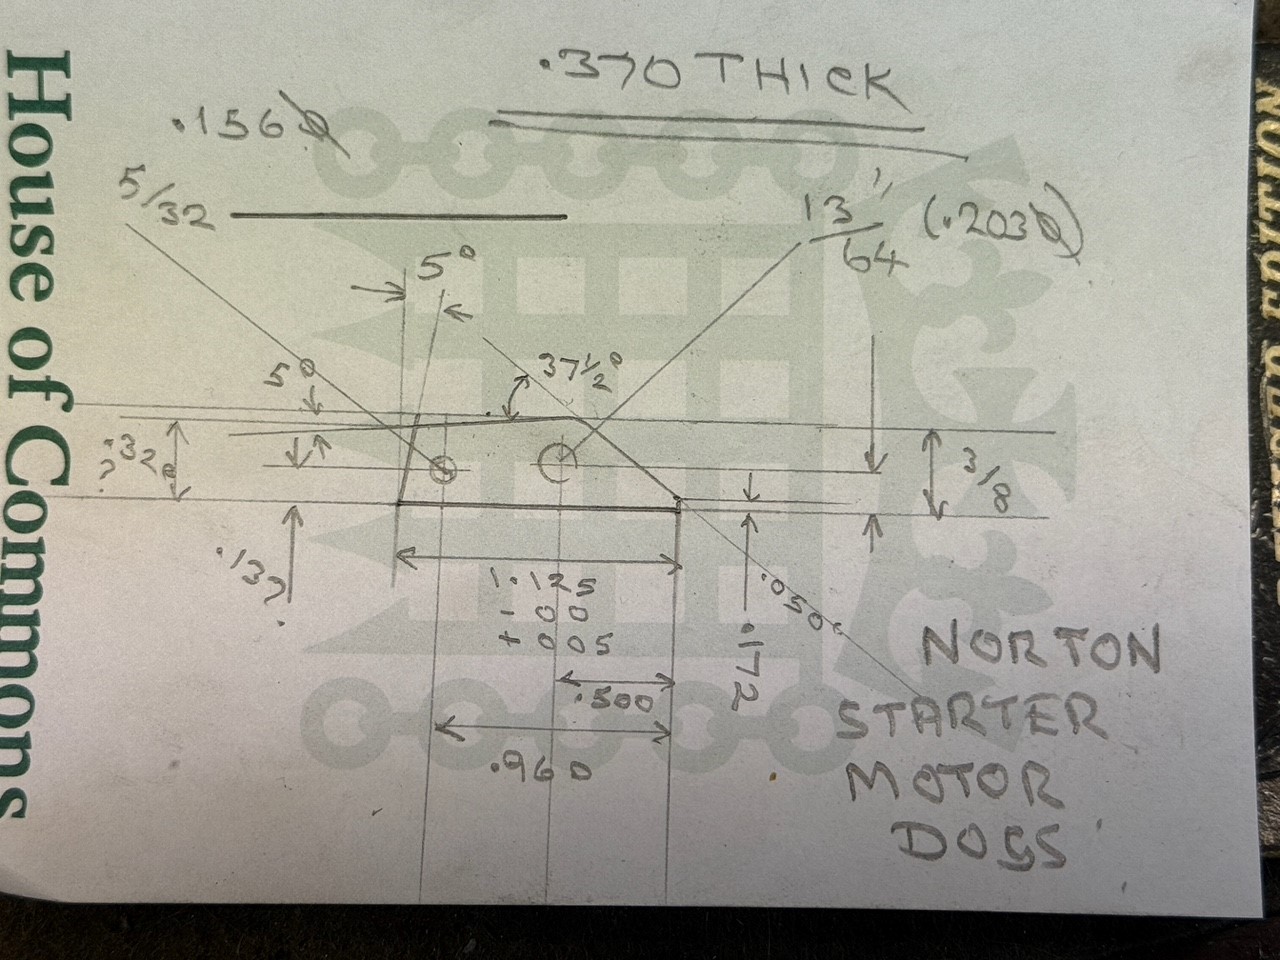 to the one on Al's website. Anyone os of course welcome to copy / download.
- Log in to post comments
Conflicting drawings
Why didn't your new mate use the drawing from AO website and which you made a pdf and published earlier in this thread?
For instance the AO drawing takes note of how important the angle of the lead face is to proper engagement with the ratchet teeth. And it's not 5 degrees. The driving force from the starter has to keep the pawl in the ratchet. Like gear dogs are given a small angle so that the driving forces always keep the dogs engaged. But not too much or the gears don't separate when lightly loaded.
I guess you like the use of Parliament Paper. The AO website drawing is better. I suspect it reproduce original detail from AMC drawings.
Peter
- Log in to post comments
I did send him...
... my improved jpg version but have no idea why he decided to make another. As far as I can see from Al's drawing the angle is 6 degrees 15 minutes which is a level of precision I doubt could be achieved in mass manufacture. It would be interesting to know its provenance.
I assume my chap measured from the pawls I sent him. I do wonder whether the sloppy fit of the pawl in the pivot pin which I have queried in the past is to allow some degree of self alignment of the pawl in the ratchet. The pawl should separate when the ratchet speeds up as the slope on the back of the tooth will push the pawl up and out of engagement.
Once I have them in my hand I'll be able to check engagement etc.
No idea why he used parliamentary paper for his sketch. But given I could find no alternative to him doing the job I feel he has made a decent fist of it.
- Log in to post comments


I would advocate using the plain shank of a 4mm Allen bolt instead of the drill shank as they can be brittle and therefore easily snapped.
As far as your starter issues "I know notting" I'm affraid.