
I am restoring a 71 Commando with standard non adjusting isolastics and am at the point of returning the engine and gearbox to the frame. Of course the big ('do I fit adjustable isolastics?') debate arises. However having just removed the 30? year old rubbers from the housings, I noticed that the inner rubbers do not fit to the bore of the brackets. The rear iso inner rubbers, nos 2 and 4 of 5 measure 34mm dia in a bore of 37mm and the front iso inner rubbers measure 42mm dia in a 47mm bore and also the bore of these rubbers is 24mm on a 19mm dia spacer. (Measured with a tape so don't hold me to precise dimensions)
My questions are:- Is this correct or has someone built with the wrong components? If it is correct, what on earth are the inner rubbers doing? Particularly the two in the front setup that just seem to be able to float where they want to. I can imagine the two rear inner rubbers acting as some kind of limiting bump stop but really don't understand the front situation.
My observation is:- If this is correct, surely these rubbers would be better fitting to the housings/spacers and maybe made from a slightly softer rubber, therefor providing a more progressive damping effect. Would this not reduce some of the vibrations all talk about?
Hope someone can clarify,
Regards,
Keith.
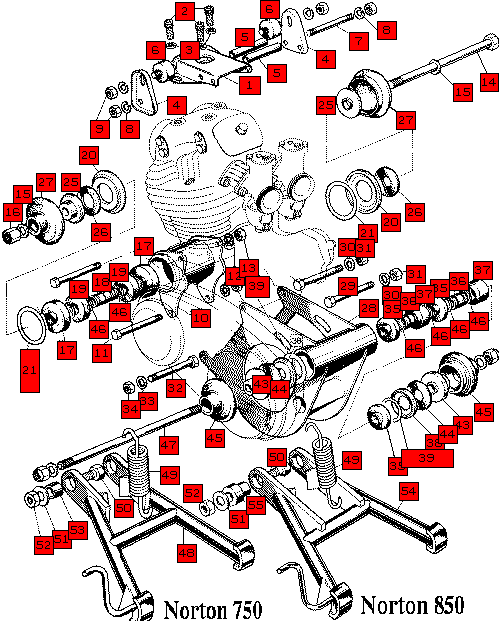
Small dia. inners are to l…
- Log in to post comments
Thanks for that Keith, the…
Thanks for that Keith, there was no sign of any circlips anywhere in the assembly and no mention of circlips in any of the workshop manuals. Still don't understand why the front middle rubbers would not be a fit to the outside diameter of the internal central spacer. I did suspect that the inner rubbers were to prevent excessive movement and can see that the Mk3 type, with bonded rubbers, is possibly a better design.
Isolastic mounts do appear to be a bit of a black art, I don't believe I've read one definitive article on what is best. I think a little experimentation is in order.
- Log in to post comments
I have a Mk3 with the adju…
I have a Mk3 with the adjustable isolastics, so fiddling and experimenting is easy.
I do remember my old Mk2A which I bought from new. When the isolastics where correctly set, it was lovely and smooth (above 2500 rpm) and handled fine. When they were a bit loose, the bike was still smooth, but the back end could feel a bit vague sometimes. I adjusted them slightly tight once, as an experiment. Handling was better, although there were vibes throughout the rev range. On one ride, I decided that I'd revert back to the specified clearance, but by the time I got home, the oil tank top bracket had fractured.
A black art indeed!
- Log in to post comments
Ta for that Allan, sounds…
Ta for that Allan, sounds to me like the isolastics don't just need adjustment in the end float, but somehow need to be adjustable for the amount of damping provided. I guess all engines will differ in the amount of out of balance they exhibit, thus requiring differing shore hardness of rubber damping to compensate.
- Log in to post comments
No circlips? I see what yo…
No circlips? I see what you mean, they are not shown on the 71 or 72 exploded views. I never realised that. You can see them on the 73 onwards diagrams as per attachment.
Attachments
013.gif
- Log in to post comments
Thanks Keith. Picture not…
Thanks Keith. Picture not too clear but looks as though it could be No.46, 2 on front and 4 on rear iso. Is there somewhere online I can view the original diag? I've a feeling I have mongrel rubbers on mine, I can't believe that there would be 5mm play between the rubber bore and the spacer on the front assy, even two circlips would not stop these floating. I was surprised when I stripped mine. I was expecting to have to press the inners out, but they just dropped out onto the floor. I will figure out a way of keeping the rubbers from moving if I decide to retain the original shimmed design. I should just say sod it and buy a MK3 adjustable set, however I am reading so many different views, with some saying the original design was better, that I'm just thinking hold the expense and try what I have.
- Log in to post comments
sorry about last post done…
sorry about last post done twice. I got a server error the first time i posted and then hey ho I got a double hit on the second effort.
Interestingly I have just been looking at spares on the Noc site and there is a picture of a center spacer. This looks a larger diameter than mine and has 4 circlip grooves. Maybe I just have a rouge center spacer. Elementary Watson.
- Log in to post comments
Hi Keith, The early isolas…
Hi Keith,
The early isolastics do not have the circlips fitted that stop the buffer rubbers potentially wandering about along the spacer. The answer in the "NOC Service Notes" and the American "Tech Digest" is to fit a piece of hosepipe over the spacer or use several wrappings of insulation tape. The buffer rubbers should be a sliding fit on the spacer
Mick Hemmings does an adjustable stainless steel end cap that retains the early rubbers, ie not a bonded one piece item, and makes adjustment much easier without messing with shims for about £35 a piece. There is no black art involved, but, ensuring your engine/gearbox cradle is parallel with the centreline of the frame, now there's a thing. If your wheels line up without skewing the rear wheel in the swinging arm you must be "the one"
- Log in to post comments
Thanks for advice David, s…
Thanks for advice David, so not the mongrel I thought i had. Front spacers were a sliding fit, if you class 5mm clearance as sliding. I have bought a newer spacer with grooves for the front, so that should be sorted. Will fit a Hemmings adjuster to the rear iso as its more inaccessible. I note your advice on the engine/cradle being parallel. How is this sorted if it's not? More shims or machining?
- Log in to post comments
I have just received new f…
I have just received new front iso rubbers in the post and guess what? The center front buffer rubbers have a bore of around 18mm which makes them a nice tight fit on my existing 19mm dia spacer. What the 25mm bore rubbers that came out were, is any ones guess. Anyway thanks for all contributions, mystery solved I think.
- Log in to post comments
When adjusting/shimming th…
When adjusting/shimming the isolastic mounts it's easy to end up with more thickness of shims on one side than the other. So, for instance, if the front mount has more thickness of shims on the leftthan the right, and the rear mount has more shims on the right than the left, you end up with the engine/gearbox/swingarm pointing to the right of the steering head axis. The wheels can still be aligned - with the rear axle moved back a bit on the left (and/or forward on the right), however the rear sprocket will then not be perfectly in line with the chain, causing excessive chain wear. But, more importantly, the rear wheel will now be a little to the left of the frame's centre line and this will affect the way the bike steers as the rake of the steering head IS in line with the machine's centre line(assuming the frame's straight). The effect of this 'out of true' is to make the machine veer to one side when you ride 'hands off'.
- Log in to post comments
Thanks for that Henry, I d…
Thanks for that Henry, I did try to balance the shims when I reassembled. I have to admit however to putting the last 10 thou shim offset on the left side of the front iso, the rear being equal both sides. Will this really put the handling that far out? Having never ridden a Norton however, I have no intention of riding 'hands off' in the near future.
- Log in to post comments
No, your 10 thou won't ma…
No, your 10 thou won't make much difference so I'd leave it alone for now (although you can get 5 thou shims if you want to get it spot on). Don't be afraid to take your hands off the bars some time when you're on a quiet stretch of road. The bike will slow down pretty quickly (and after a bit it might start to shake it's head) but it should steer straight. Any tendency to veer off consistantly to one side will indicate that the frame is not perfectly true, or that the engine cradle isn't quite aligned with the frame's centre line. But unless it's bad, it won't affect the handling an awful lot - you'll probably compensate by pulling on one handle bar and pushing on the other without realising it. But going hands-off will reveal any error.
- Log in to post comments
Thanks Henry, I'll leave…
Thanks Henry, I'll leave be for now. It will probably need re-shimming after a few hundred miles anyway. I'll balance it then if there is a problem. If you've read my question on the front forks, I can see those being more of a problem. All good fun though, I love a challenge.
- Log in to post comments


Small dia. inners are to limit absolute movement and in normal use they never contact the inside dia. of the tube on front and back. The small dia. rubbers should be located with circlips in both front and rear. On Mk3 they are bonded and there is one less on each tube.