
My 1951 ES2 has what might be the original saddle plus a modern replica and both have been installed with various springs, hardware and brackets. Several people have messed with it before me and I've experimented with the various bolt holes and positioning...never to my satisfaction.
my old parts manual shows the spring post bolts and I've got those right but can't find any diagrams of the bracket and mounting system at the nose of the saddle.
Probably this has already been discussed in the NOC forum but I can't find it. I hope to find a photo or diagram of the "correct " saddle installation . Ideally a clear side view without the petrol tank installed would show me the nose of the saddle and what the mounting bracket looks like.
if anybody can point me in the right direction I would be grateful
Grant MacNeill in Toronto
Hi Grant, my ES2 seems to…
- Log in to post comments
Thanks Ian...that is very…
Thanks Ian...that is very helpful. My original seat has two square bars similar to yours that are double-bolted to the seat frame. My replica seat has single bolts at the fame so that allows the nose of the seat to bob up and down a bit. Now that I see yours I realise that it was not intended to do that. I gather there must be a little movement at the frame boss under your tank as the saddle springs bob up and down?
My seat seems to always be a little high at the back and i keep moving around the attachment points to come up with the perfect spot...certainly not intuitive ...every time i think I've nailed it I step back and it looks odd and feels even more odd when I sit on it. Seems to alway feel like its leaning forward and about to launch me off the bike. Maybe need to gain a few pounds eh?
If it is not too much trouble; could you send me a side view photo so I can see the level of the seat and possibly which of the three optional bolt holes you bolt the springs to on the back of the saddle.
I too have trouble posting more than one photo...when it works it is entierely by accident.
Saddle springs: I'm thinking that if there were springs that were about 1" shorter everything would fall into place as the back would tend to sit lower relative to the frame boss
Thanks for the help...still riding and hope to get another month in before the snow
Grant
- Log in to post comments
Ian...if you get into the…
Ian...if you get into the mood to photograph...could you kindly include a shot of your battery carrier please if you think yours is probably original
regards, Grant
- Log in to post comments
Grant, yes the seat does p…
Grant, yes the seat does pivot on that frame boss. If you have a seat with single bolts at the nose they have to be really tight otherwise the seat ends up supported by the carburettor (been there with my CS1)! At the rear of my ES2 seat there is a pair of L brackets riveted to the frame, and only one hole in each bracket for the top of the spring so no choice of spring attachment point. No snow here in Northern Ireland either, but very wet & windy so no fun taking the bike out right now.
Cheers, Ian McD
Attachments
es2_batt_1.jpg
es2_seat_3-jpg
technic
- Log in to post comments
Previously Ian MacDougall…
Previously Ian MacDougall wrote:
Grant, yes the seat does pivot on that frame boss. If you have a seat with single bolts at the nose they have to be really tight otherwise the seat ends up supported by the carburettor (been there with my CS1)! At the rear of my ES2 seat there is a pair of L brackets riveted to the frame, and only one hole in each bracket for the top of the spring so no choice of spring attachment point. No snow here in Northern Ireland either, but very wet & windy so no fun taking the bike out right now.
Cheers, Ian McD
Hi Ian. Rode to work it was lovely and sunny...temp hit 14C. Rode home in a cold rain. typical November !
Thanks for the photos. A big big help. My "original" saddle is a Brian R Verrall. Either original or nearly so and my new one is a Wassell but it has the same frame. I see now that the brackets on yours are what Isee online on the new, extra large Big 4 saddle. They look about the same height from the frame as mine but these brackets bring the top of the spring inboard...forward a good inch or so. When I tighten everything down on mine is looks splayed and just plain wrong. I'm going to make up a couple brackets to shift the springs inboard and see what that does.
My saddle is tilted forward too. Feel like I am going to slide onto the tank.
My springs are 5 1/2 inches long and I see that the springs with some on line suppliers are 4 1/2 long which would drop the back of the seat nicely.
Also the nose of many of the seats i see on line is blunt and deep like mine. Where others seem to taper away on the bottom like yours which allows the seat nose to nestle nicely up to the tank. All of the smaller sized Lycette seats (listed as BSA Bantam plunger) have a more tapered nose plus rear brackets similar to yours.
So...this poses more questions for me.
Could I trouble you one last time please?
could you measure - the lenth of your springs - length and width of your saddle, and - width and depth at the nose.
inches or those new-fangled metrick inches would work for me
Knowing the 1951 saddle size should enable me to sus this out and either adapt my old Verrall which has a great patina or find one that will fit nicely like yours.
THANKS ! this is a huge help !!
Grant
Thanks too for the photo of the battery box. Another mystery solved. I've got the same box but somebody cobbled on a different front strap.
- Log in to post comments
Previously Ian MacDougall…
Previously Ian MacDougall wrote:
Grant, yes the seat does pivot on that frame boss. If you have a seat with single bolts at the nose they have to be really tight otherwise the seat ends up supported by the carburettor (been there with my CS1)! At the rear of my ES2 seat there is a pair of L brackets riveted to the frame, and only one hole in each bracket for the top of the spring so no choice of spring attachment point. No snow here in Northern Ireland either, but very wet & windy so no fun taking the bike out right now.
Cheers, Ian McD
Well Ian those pics have helped me as well. I am having to remove the front bolt fixings of the seat enabling me to push it back so I can remove the tank. I need those 'L' brackets and longer fronts to position my seat further back. Next job when I have the engine back in after a crank rebuild. John
- Log in to post comments
No trouble, dimensions are…
No trouble, dimensions are: Spring length 4.75", Saddle length 11.5", Saddle width 14", Nose width 3", Nose depth (at first rivet) 3.25". I have not owned this bike for very long and have no history with it. The bike looks original and unmolested so I am assuming that the seat is the original fitment, although it must have been re-covered at some time and there is no maker's label attached. This ES2 is 1950 (E4 prefix) but I do not think that there were any significant changes from '50 to '51. The main problem I need to sort out before putting the bike back on the road is a fuel tank which contains a large amount of petseal (or similar) which will not be compatible with ethanol fuels.
Cheers, Ian McD
- Log in to post comments
The main problem I need to…
The main problem I need to sort out before putting the bike back on the road is a fuel tank which contains a large amount of petseal (or similar) which will not be compatible with ethanol fuels.
Cheers, Ian McD
Hi Ian. I have the same problem with my tank and found that modern fuel is begining to make the petseal soft. On another thread on this subject I was recomended something that would disolve petseal and clean the tank. £20 later it made no difference what's so ever so I will just leave it and see what happens. John
- Log in to post comments
Hi John, thanks that is pr…
Hi John, thanks that is probably sound advice. I already have 2 tanks (1 Norton, 1 Triumph flat tank) that require repairs to stop leaks and I don't need another one in the queue! Glad that the seat info helped you as well, good luck with the crank rebuild.
Cheers, Ian McD
- Log in to post comments
Ian, using your 125mm dime…
Ian, using your 125mm dimension, my front brackets required extending by 30mm. With all new fittings the seat now sits in a better position and looks better for it. John
- Log in to post comments
Previously Ian MacDougall…
Previously Ian MacDougall wrote:
No trouble, dimensions are: Spring length 4.75", Saddle length 11.5", Saddle width 14", Nose width 3", Nose depth (at first rivet) 3.25". I have not owned this bike for very long and have no history with it. The bike looks original and unmolested so I am assuming that the seat is the original fitment, although it must have been re-covered at some time and there is no maker's label attached. This ES2 is 1950 (E4 prefix) but I do not think that there were any significant changes from '50 to '51. The main problem I need to sort out before putting the bike back on the road is a fuel tank which contains a large amount of petseal (or similar) which will not be compatible with ethanol fuels.
Cheers, Ian McD
Ian...just a quick note to thank you for the info. those dimensions were a big help and will help me get everything sorted nicely with the saddle.
I had a tank on a |BSA that has been sealed with the old cream sealant that is not ethanol resistant. In theory their stripper chemical will remove it but i was so busy continued to use the bike. did not seem to affect the quality of the fuel and the screens prevented the bits from getting into the carb. Once this ssealant goes soft, ideally you want to get it all off. But even with the stripper there will be lots left behind. My buddy ran a warm hair drier through his tank for a couple of days to re-cure the old stuff, then recoated on top of it with the new product and that seemed to work. That said, the manufacturers insist that you must get all of the original soft sealant off. (wishful thinking on their part ? )
Eventually bought a new tank from Vintage Spares in India. I bought 4 tanks from them now for various bikes with good success. They actually respond to emails and will answer questions.
cheers, Grant
PS...post a photo some time of your 1950 ES2. I would love to see it !
- Log in to post comments
Grant, following your posi…
Grant, following your positive comments I have looked at the tanks offered by Vintage Spares. I may well go that way if/when the sealer in the current tank gives problems. Unfortunately they don't list a tank for a 1923 Triumph - that's the one I really need right now. Attached picture is of the ES2 as purchased a few years ago. Very little done (and I've run out of excuses since retiring!) except for a new exhaust. The old one does not look too bad in this pic but it was very light material with several dings in pipe & silencer and the kickstart was hitting the silencer. Feked system fits nicely. Need to look at the centre stand, it has threaded rod instead of pivot bolts and I expect to find the mounting hole threads stripped. Engine runs and sounds sweet. It really should not take much effort to get back on the road. This one is actually my wife's bike and she is starting to ask questions about why she can't use it yet! Other Nortons in the garage are a 1956 19S owned since 1976 and a 1937 CS1.
Good luck with completion of your rebuild, Ian McD
Attachments
es2_1950-jpg
- Log in to post comments
Hello Ian Lovely bike. tha…
Hello Ian
Lovely bike. thanks very much for the photo. identical to my bike except without the dents and dings in the fenders...and you have the older version oil tank.
Great ! At last I have a good reference photo of an unmolested bike only a few months older than mine.
if you are up for it some time...post a photo of the other side please so i will have the complete picture.
Thanks !
Grant
Rode the ES2 to work today. Temp just above freezing but it seems to run better in the cold.
- Log in to post comments
Need to look at the centre…
Need to look at the centre stand, it has threaded rod instead of pivot bolts and I expect to find the mounting hole threads stripped.
Hi Ian. Just noticed your comment. Had the same problem on my 52' wreck' when acquired but the threaded holes were ok. Used appropriate sized cycle thread bolts and made up steel bushes that were a good fit on the bolt and the worn holes in the stand. Now sits with the rear wheel clear of the ground. John
- Log in to post comments
Apologies Grant, I should…
Apologies Grant, I should have posted this photo sooner.
Thanks John for your suggestion to sort out the centre stand. The bolt and bushes sounds like a practical solution, given that the original shoulder bolts are probably unobtainable. Still haven't investigated the condition of the threads but will get there eventually!
Cheers
Ian McD
Attachments
es2_1950_lhs-jpg
- Log in to post comments
Center stand bolts availab…
Center stand bolts available through NOC Shop.
pt # b4/525
- Log in to post comments
Thanks Michael, bolts orde…
Thanks Michael, bolts ordered. The shop, and the range of singles parts on offer, has come a long way since I first joined the NOC. Must check it out more often.
Cheers
Ian McD
- Log in to post comments


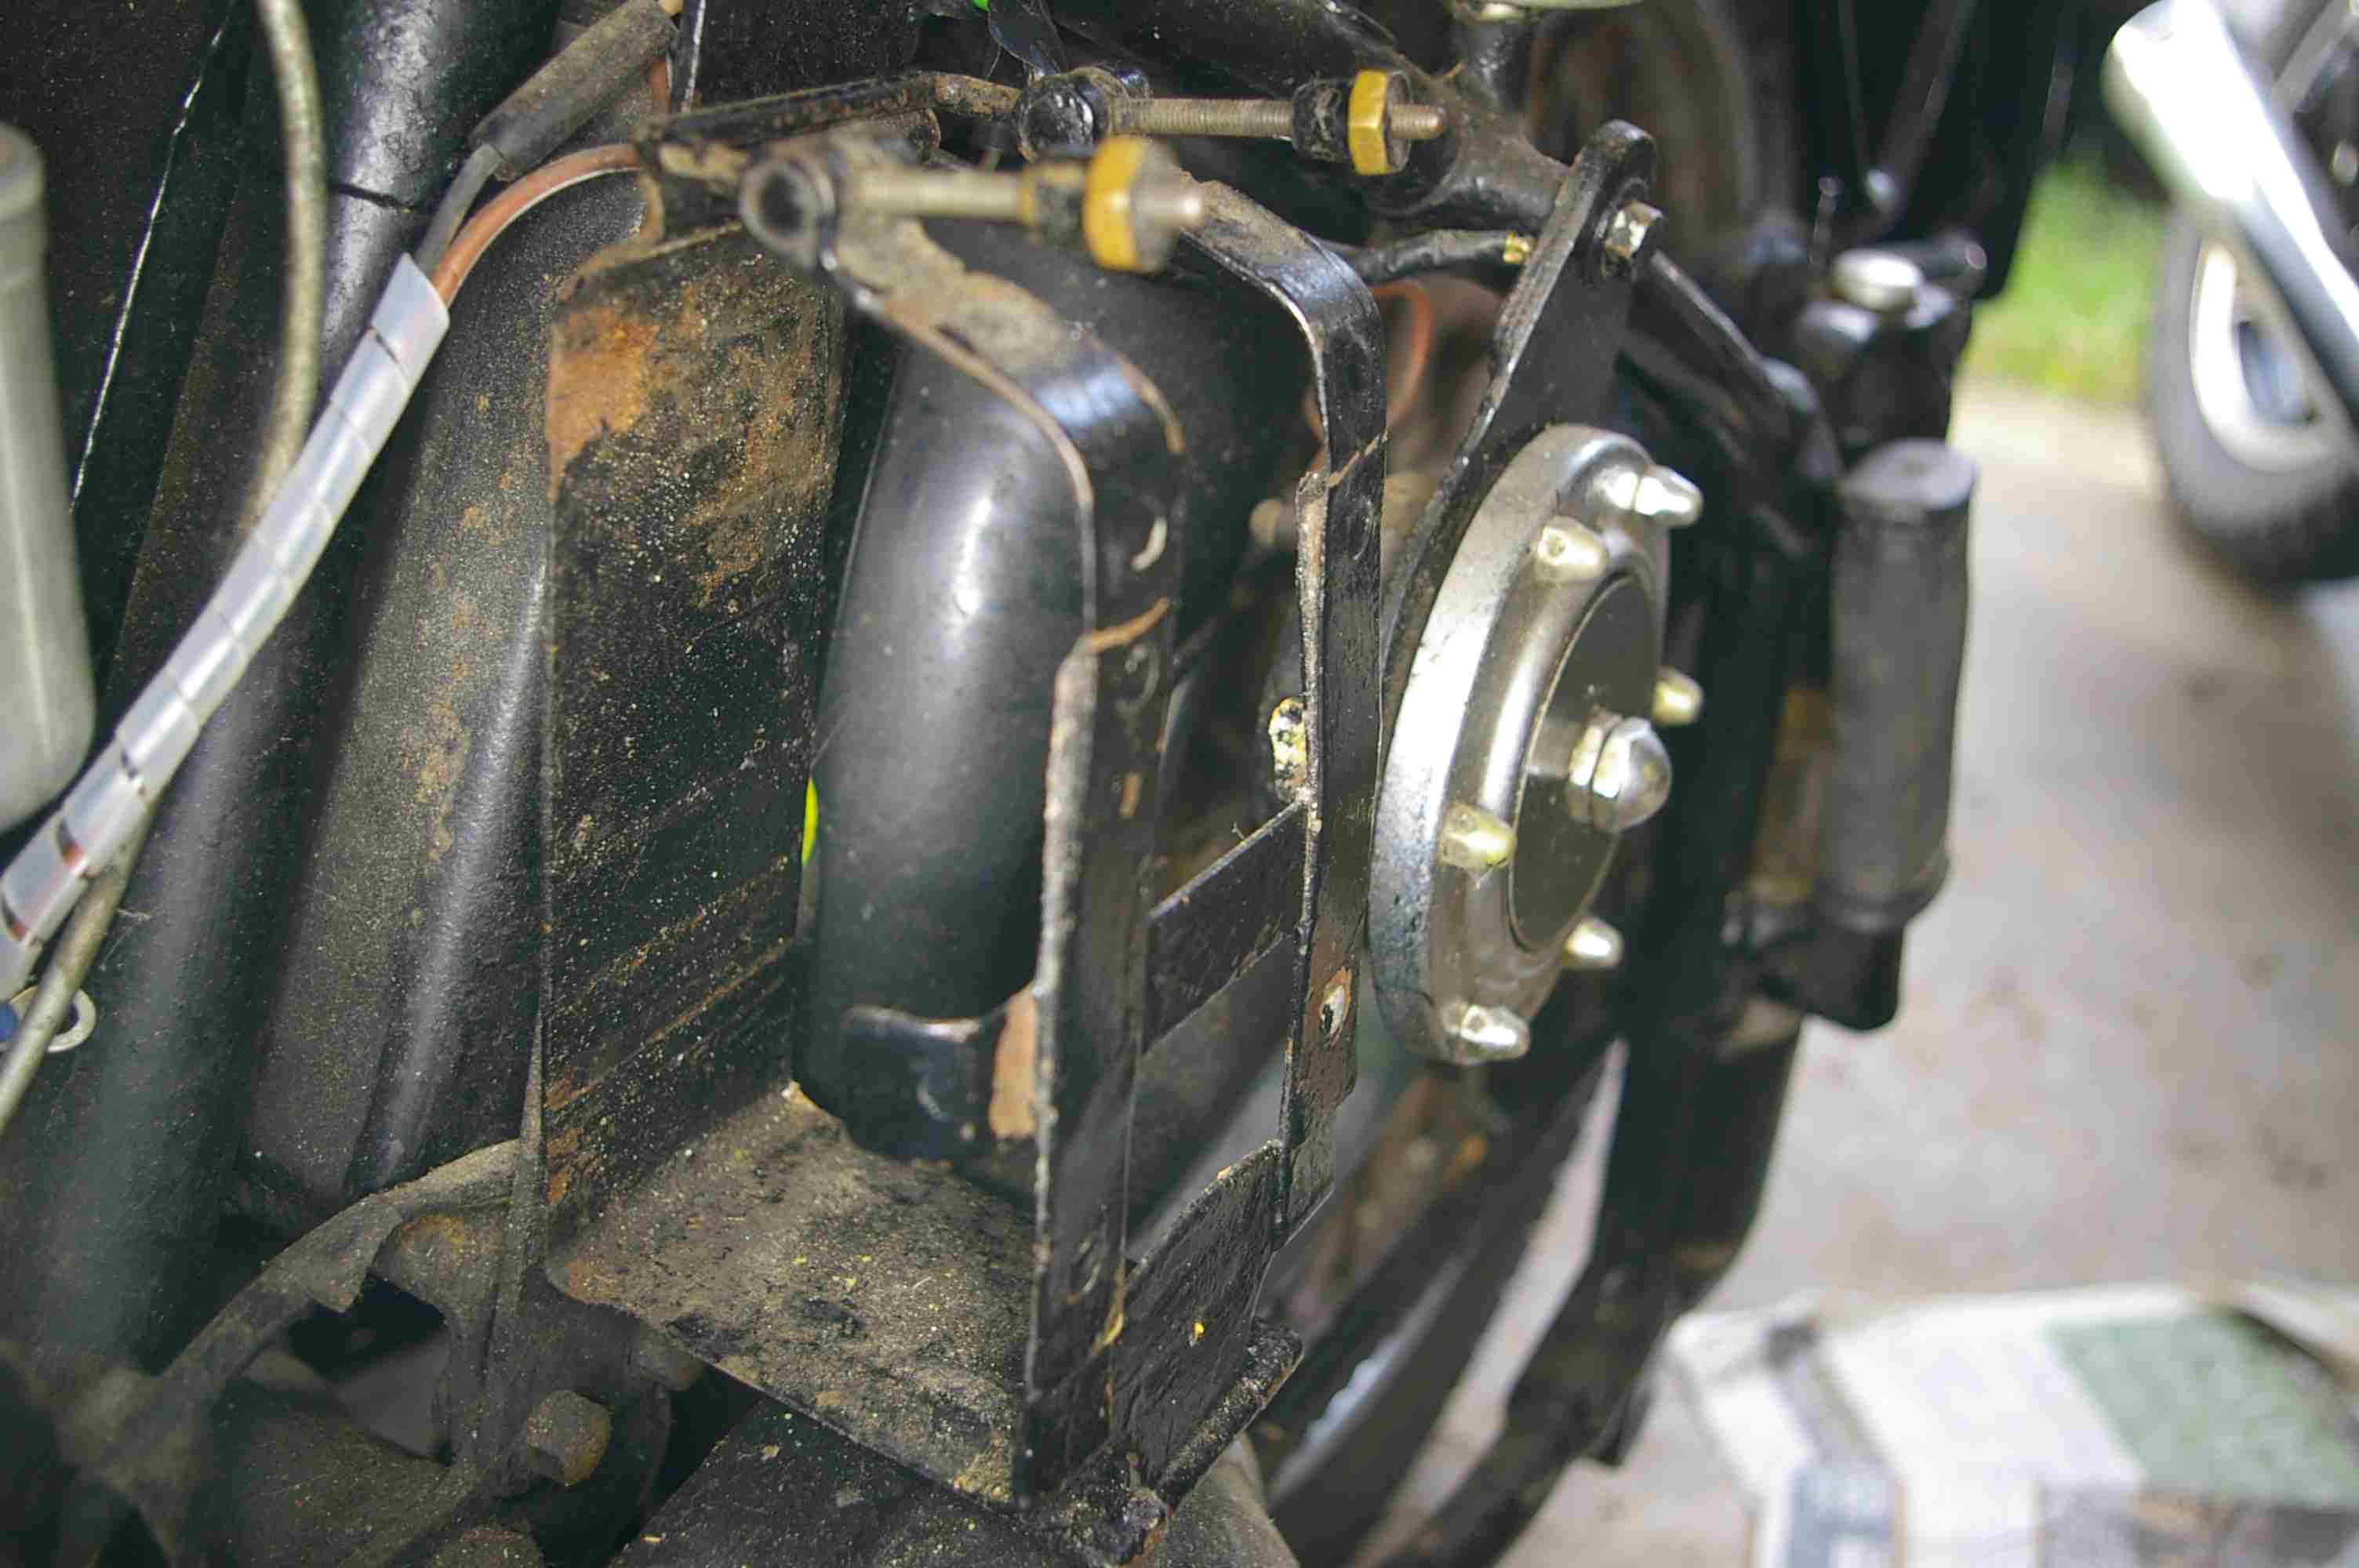
Hi Grant, my ES2 seems to be fairly original and even better the tank is off at the moment. Hope these pics help. As you can see I would not recommend routing any cables between the 2 seat nose support brackets. You were also asking about the exhaust support - that has been answered fairly well already but I would add that the exhaust I bought recently from Feked fits really well and the bend of the pipe passes very close to the extended bolt (although I have not yet tried to re-attach the clip).
Cheers, Ian McD
Attachments
es2_seat_1.jpg
es2_seat_2-jpg