
My tank has returned.. now to paint the side panels.
Late '30's bikes had the red pin stripe outside the black. I imagine Norton only did that for a few years - until they realised the lines rubbed off since they could not rub down, prime etc. along a pin stripe line. But never mind - I'll crack on. I have some nice new old stock red lead-based signwriter's paint so that should stick quite well.
But on the main panel - must I rub the chrome down with wet+dry or can I just degrease it thoroughly and spray (rattle can etch primer)? If I were paying lots of money for someone else to do it, I'd expect the wet+dry approach - but if it all goes horribly wrong I can always strip the lot off and start again if I do it myself. I don't expect to need the hard wear an owner might want if i spent my weekends green laning...
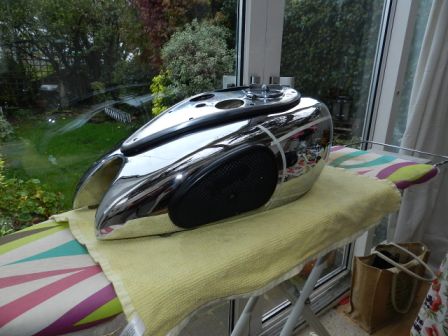
Pics for anyone interested. The first shows why the option of leaving it in 'unrestored patina' condition was not really an option. The second is Collins Chemical Blacking's job. They didn't (or couldn't..) produces the smooth, flat, almost white satin chrome on the instrument panel but never mind.
Attachments
DSCN2614.JPG
And the original state...…
- Log in to post comments
According to the photo's…
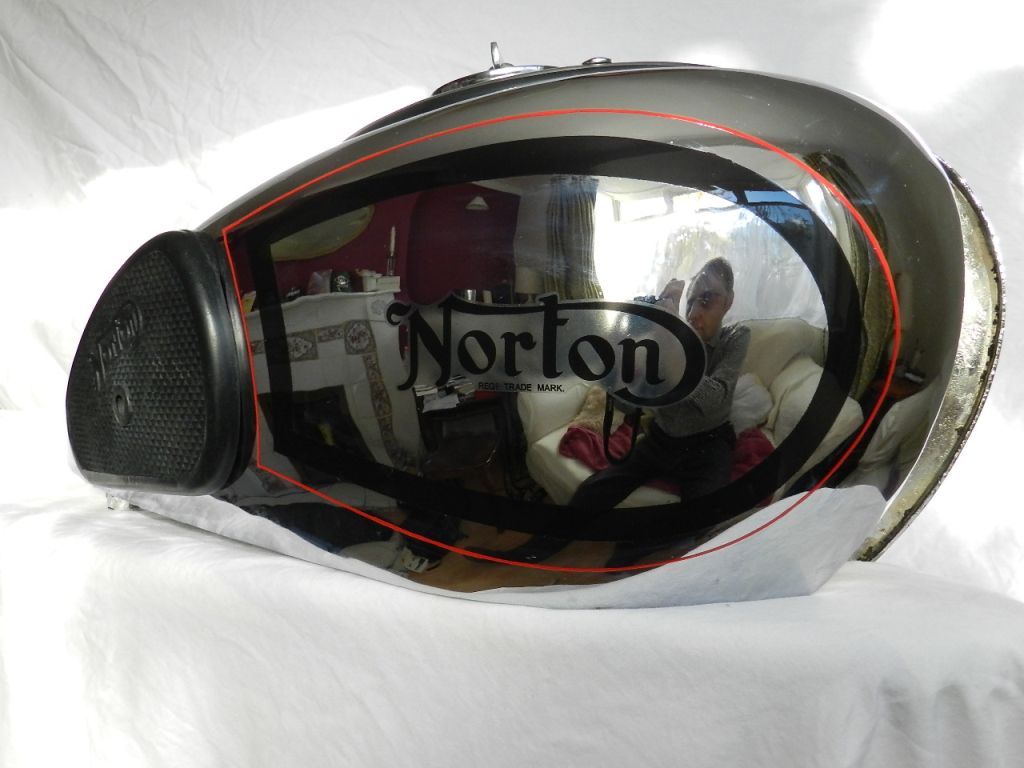
According to the photo's in the Norton Singles book by Bacon, the last year of the narrow red stripe outside the larger black stripe was 1938 and 1939 and on have the red inside the black.
On my 1946 Model 18, the striping was applied directly to the chrome with self etching primer.
I have put 2300 miles on the machine since it return to the road and the stripes are still in place after numerous cleanings and polishing. The rims were done in a similar fashion and aside from a stray stone chip seem to be holding up fine.
FWIW
Mark Zenor
- Log in to post comments
Finished for now. 1937 bik…
Finished for now. 1937 bike so red outside chrome.
Decided not to spray the silver paint panel. Weather isn't warm enough. So for the time being it's staying chrome. Maybe I'll do the silver next spring. Not too difficult with the outside red line.
Attachments
DSCN2630.JPG
- Log in to post comments
looks great david have to…
looks great david
have to say in the past i have had no luck painting chromed parts and the paint has eventually fallen off or was easily chipped, saying that i never had anything other than a regular etch primer to try and stick the paint on.
- Log in to post comments
Thanks, Duncan. "What man…
Thanks, Duncan.
"What man has done - man can do again!" I just hope it isn't too often...and I've done it for me nobody is going to ask for his money back.
The red is new old stock red lead-based paint - very sticky and very red so I'm cautiously optimistic.
Now I need a varnish to protect the transfers and as usual indecision rules. 'Classic Tranfers' say do NOT use modern rattle can acrylics, two pack etc but stick to oil-based.
- Log in to post comments
Hi David Nortons had a red…
Hi David
Nortons had a red line outside of the silver/black panel from 1935 to 1938.
Painting chrome tanks can be a bit fraught unless you are familiar with or have access to profesional equipment. The process for painting large panels on chrome goes like this - mask accurately then carefully dry sand with 400 wet & dry. Re-mask just on the edge of your sanded panel & etch prime. repeat with primer - filler if you have any imperfections in the metal finish, and dry sand with 800 W&D.Then the silver panel. Then mask & spray the black wide line. All of the basecoats can be cellulose if required.Then 2 pack clearcoat over the whole panel. 2 Pack lacquer needs the correct breathing equipment. Each one of these paint layers needs a re-masking & moving out a fraction, otherwise you will have a final edge showing undercoat colours.Then your transfers, having a clear lacquer base under them allows for any problems like miss-alignment and having to scrape off the transfer. Classic Transfers stick straight away, and do not have much water'slide'. Scrape off on a silver basecoat and any marks on the silver will be magnified by the clear topcoat.
Transfers need a very light 2 pack dust coat to seal, then clearcotelocally masked to finish. This can then be cut back to blend into the existing lacquer. This is an abreviated version of the process!
The only paint that will really stick to chrome, and for the thin red line, is 2 pack epoxy. It is also fuel proof, polyurethane is not. It works best sprayed on, using 3M vinyl masking tape. Judging when to remove the tape is alsoa difficult one, generally around 12 hours later. Do it all in warm dry weather. Hope this has not put you off. Attached pics of my 1938 CS1 tank. Roger.
- Log in to post comments
Help! Each picture is arou…
Help!
Each picture is around 1.5mb, have tried to upload them individually, but all I get from this site is 'attachment is too large'
Anyone know how to get around this? !!!
Roger
- Log in to post comments
If you have Microsoft Outl…
If you have Microsoft Outlook, you can attach a file and send it to yourself. It gives you the options to send smaller file sizes. Large, medium or small - choose the one that suits. Copy the one you want somewhere convenient on your computer and then attach it.
Don't know about Microsoft Express...or web-based e-mail. Probably have to use software than came with your camera?
- Log in to post comments
I have been working today…
I have been working today with our designers on the upgrade to this web site. One of the features we will be incorporating is an increase on the file attachment size limit, presently just 100k. In future, we will allow uploads to around 1 or 2Mb in size so that Members can show more detailed images.
- Log in to post comments
Hello David and Chris, Tha…
Hello David and Chris,
Thank youfor that information.
Chris, is the proposed increase to file size imminent? If not I will try David's suggestion to-morrow.
Regards,
Roger
- Log in to post comments
Roger, By no means imminen…
Roger,
By no means imminent I am afraid. Go ahead with the other suggestion for now.
- Log in to post comments
easy solution is a picture…
easy solution is a picture editor to resize the picture files that straight from the camera are always 1mb+
one free program i have used for years is called infran view.
search for it on www.download.com once installed open a picture with the program and goto edit > resize usualy just resizing to your actual screen size is enough to get most images under 100kb then all you need to do is save a copy of the resized image
- Log in to post comments


And the original state...
Attachments
IMG_5750.JPG