
I bought my 2A Commando about 40 years ago and at some point I checked the Isolastic tolerances. That was at least 25 years ago so I thought I would check them again - whether they needed it or not. Not surprising they were as slack as a welly top - so I set out to rectify the situation, which is where my problems began.
Front drive side I backed off the grubscrew but could get no more than perhaps a quarter inch, measured around the largest circumference of the alloy stop. The other side turned easily and I was able to reset the gap to 10 thou - assuming this would equate to 5 thou each side once the bike was moving?
On the back, things were rather different. On the Offside, the gap was again far too big, but easily accomodated by the alloy adjuster, which had about 6 radial holes in it, each one tapped to take a grub screw. One of them had a grub screw fitted, which I removed without a problem to facilitate adjustment. On the Primary side however, the alloy stop had niether radial holes nor grub screw at all, which was a surprise, and I could only get it to move perhaps 10 degrees in either direction. In each case these alloy stop ends felt "rubbery" as though it had somehow corroded itself to the through bolt and this in turn had corroded itself into the rubber damping bushes?
Although I said that my bike was a 2A, it was rebuilt into a new mk3 frame before I got it, which may have a bearing on my problem? During the process I have had the bike sitting on a trolley jack across its frame rails with the rear wheel clear of the ground.
Does anybody recognise the Vernier Isolastic kit I have and can you advise what's best to do under the circumstances?
Thank you in anticipation for any advice.
If it were me.
- Log in to post comments
Rear Isolastics
Thank you John, much appreciated. Having since trawled Youtube and others I think I have a plan based on the kit I have, which would be to strip out the primary cases. Clamp the front wheel in the wheel clamp on my bike lift, then use an engine lift on the rear frame loop to take the weight of the frame and allow the rear iso to move down (by way of a scissor jack under the engine plates), once the top Iso is disconnected, with engine box etc pivoting on the front Iso. New Iso kits are on order from RGM. Fingers crossed!
- Log in to post comments
At a guess, based on your…
At a guess, based on your description, I'd say you have the adjustable isolastic end caps sold by Mick Hemmings:
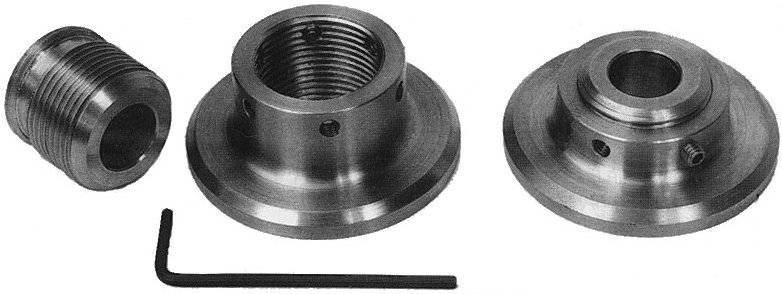
Angie Hemmings might be able to help you with an instruction sheet.
- Log in to post comments


I would change both your Iso's to new MK3 type due to age. For the front mount there are two types available depending on your front mount. if the mount is MK3 ( both ends on the mount the same width ) or two different widths on the end of the mount (750 or 850) both versions are available to fit straight in from RGM. in the old days you had to machine the older mounts to MK3 spec making them equal by removing 1/4 inch from one side.
For the rear ISO MK3 vernier type these are the same so no mods needed. You can fit the rear one with the engine in the frame but have to remove the chaincases and rear wheel from memory.
There is a video on youtube.
I did this when my wife bought her MK2a as the old mounts were not great and at the same time fitted an Alton starter for her.
I hope this makes sense, the result will be worthwhile.