
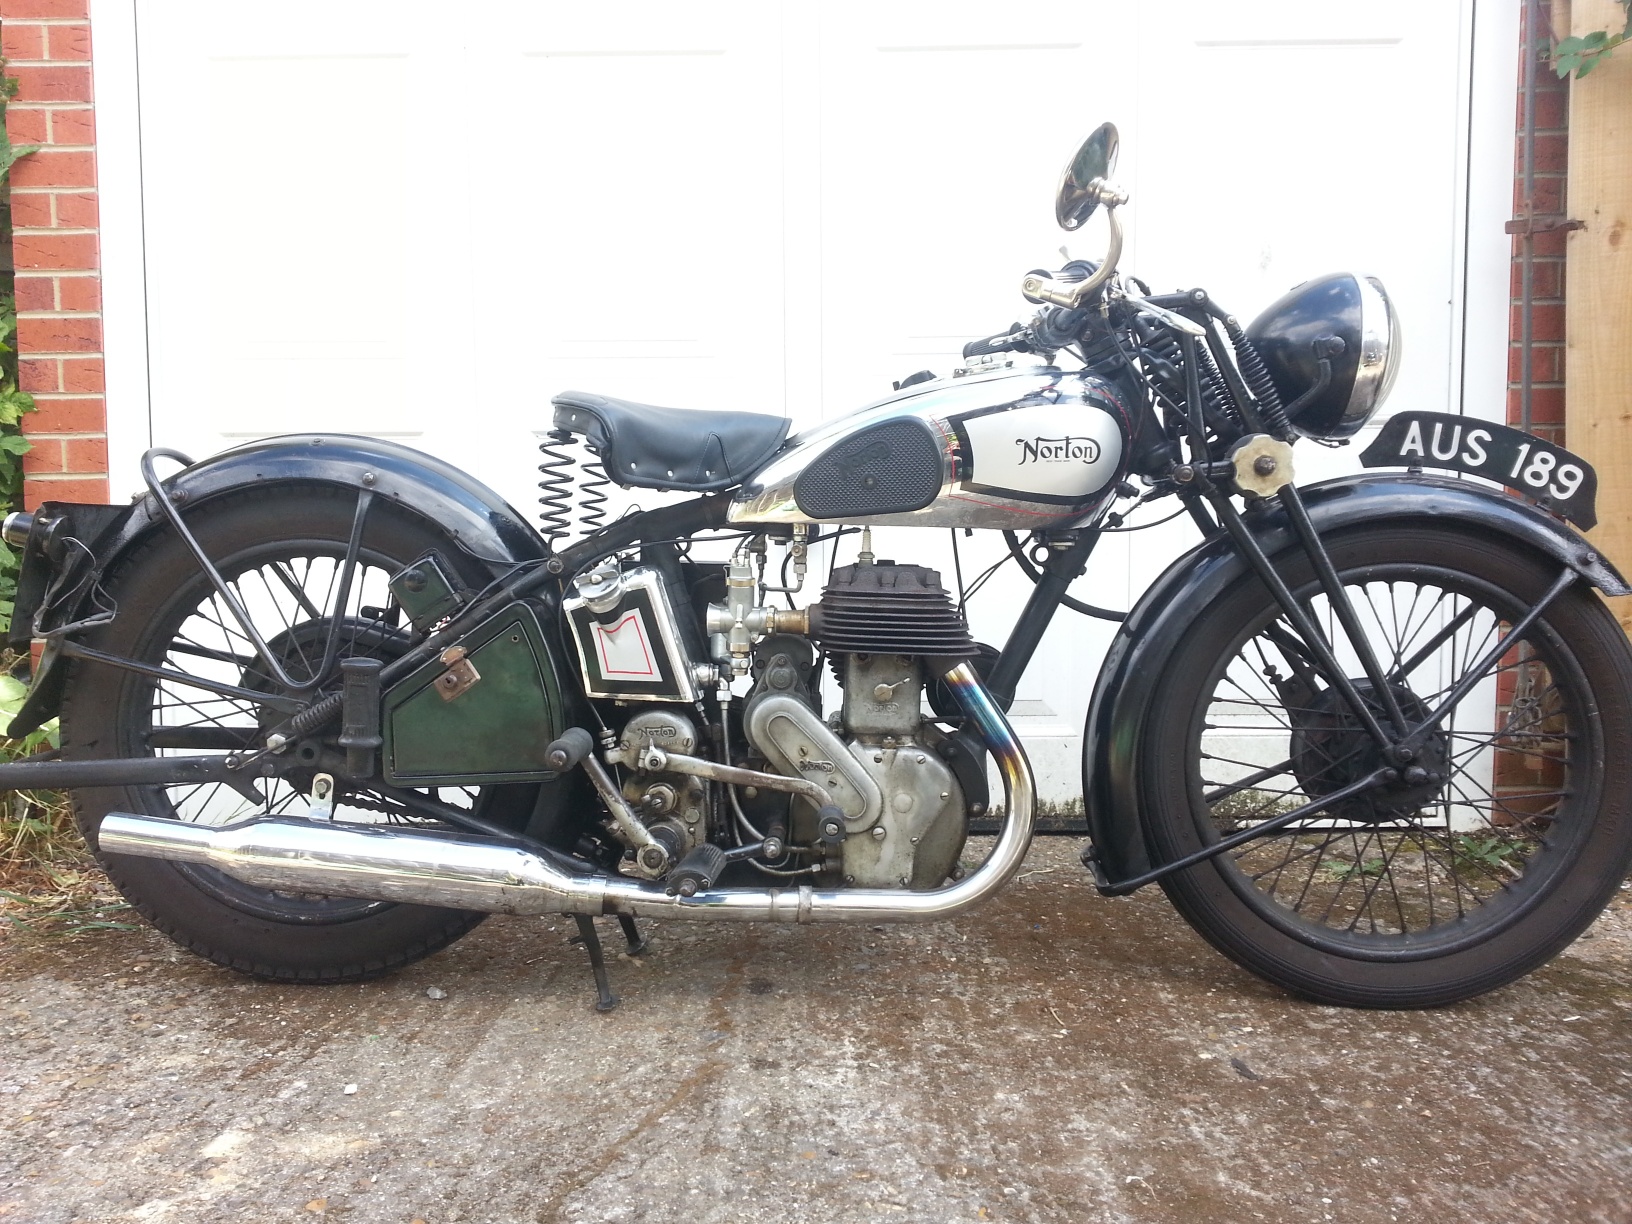
After a contretemps with the bike on it's lift I now have to have the dent knocked out of the tank and the whole thing re-sprayed and lined (black/red striping).
I have the choice of having it sprayed and lacquered then lined (cheaper) or sprayed, lined then lacquered (cheaper).
My view is that the dearer option will protect the lining.
Any arguments for doing it the cheaper way (apart from the fact that it's cheaper!)?
George
painting colours and lining
- Log in to post comments
You may have slipped a typo…
You may have slipped a typo in there George, as you're indicating that both the options were 'cheaper'...Obviously lacquering the lines will protect them, but that isn't how it was done originally and is why any surviving original schemes have well-rubbed lining.
It depends what sort of effect you're going for...and whether you're dealing with a chromed tank. Personally, I think that while lacquered lines look fine with the bright finishes of 1970s machines, the traditional Nortons look better with coach lining as original. The raised edge helps to define the panels.
- Log in to post comments
Thanks Richard. Sorry about…
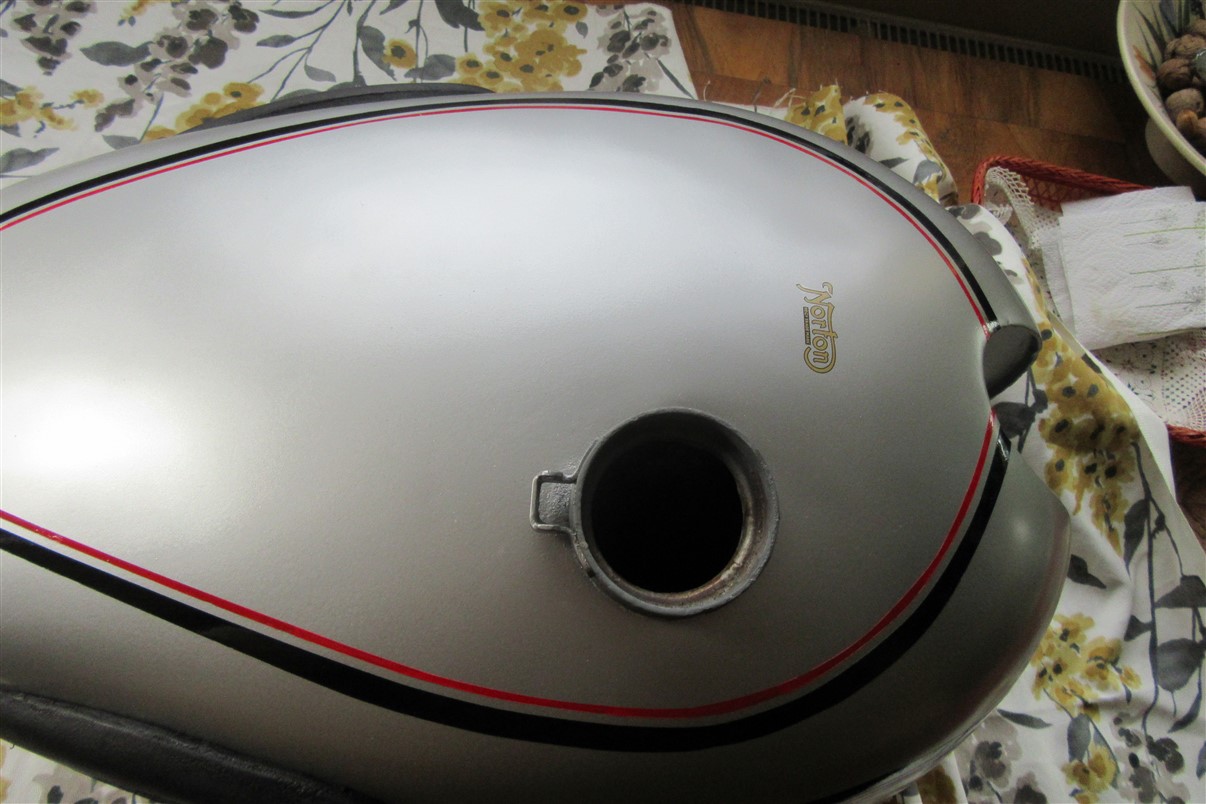
Thanks Richard. Sorry about the typo. The 2nd option is dearer as it requires two lots of rubbing down. By rights it should be chromes with silver panels (standard for a '55 ES2) but I'm not fussed about that. I'm happy with a completely "silver" tank. Interesting point about the raised edge.
Wasn't sure from your answer, Anna, which side of the fence you are on?
George
- Log in to post comments
pinstriping
Hello George What side of the fence I am On , Well I am Not on any sides of a Fence , I just tell you the facts of Norton History, if any of you are even interested most bikers have there heads in the cafe racer cloud , and not Factory standard Machines witch Norton made some beautiful looking motorcycles in there time, right up to the closure of Bracebridge Street , after this things went back to basics, and wonderful models stop being made I am strictly Bracebridge Street, and nothing to me maters after this, So i do not go there, Yours Anna J
- Log in to post comments
Raised edge?
Although my lining does have a raised edge as I use 3M edging tape to delineate its edges, not being a skilled (or even unskilled) signwriter, I don't think that would have been the case originally as the lines would have been applied with a single sweep of the painter's lining quill so would have been well-nigh flush.
- Log in to post comments
A possible advantage for laquer under the lines....
One painter I know paints the tank and laquers it. The lines are then applied over the laquer. His reasoning is that if the lining goes astray he can wipe them off and start again without affecting the underlying paint, and so does not have to repaint the whole tank (at his own expense). He finishes off with another coat of laquer to protect the lines. That makes two coats of laquer so your guy will probably charge more again!
Ian McD
- Log in to post comments
I agree that enamel lines on…
I agree that enamel lines on top of the paint work, and un-lacquered, will look more 'original' if they are hand applied.
But there are two problems. The main difficulty is that lining is (always?) done with enamel paint and that will soon get attacked by any modern petrol spillage. Secondly, a lot of tank lining is done with masking tape first to get the outlines, then the gaps filled with enamel paint. If these are not lacquered the taped edge is prominent.
Modern auto shop paint spraying is done with base polyester paint and if the colour is any type of metallic it HAS to be sprayed first with 2K lacquer (sealer) because the polyester base is soft (Black and many solid colours can be sprayed as a self-cure 2K). After which enamel lines can go on (by competent hand or tape), then you decide whether you want those lines sealed with further lacquer or you leave them to risk the petrol.
The above is how I understand it, having done a few tanks myself, but if a paint expert wants to add another view then I would be pleased to hear it.
- Log in to post comments
For what it's worth - I…
For what it's worth - I lined my prewar tank with lead-based enamel (using a Beuglar lining pen). It had to go directly onto the chrome at that date (bad idea by a marketing person), so the issue of lacquer did not arise. The important things are:
a) It doesn't wash off but I try not to splash fuel about.
b) it's quite easy to repair. A short piece got lost but it was easy to touch back in. It's not a major event like losing a patch of paint from the tank.
Much the same goes for the black, which is Humbrol. Again a couple of bits have been damaged but it's easy to repair.
Incidentally the silver is a two-pack that comes in one aerosol can. I sprayed it out of doors on a still summer's day. It seems to be fuel proof.
https://www.riolettcustomaerosols.co.uk/2k-aerosol-spray-paint/
The result doesn't look like a modern paint finish but I don't much care.
- Log in to post comments
The process your tank would…
The process your tank would need to go through if you require the lines to be lacquered over is, after the colour is applied, a coat of lacquer, which will then need to be flatted down. It then goes to the stripe man, who will have to be meticulously clean with his handling of it. Back to the painter, who will have to clean it off, and re-lacquer the whole tank.
The same painter did 2 tanks of mine in 2012, both chrome tanks, one a 1955 Wideline, the other a Royal Enfield Constellation. In both cases they were lined after lacquering, and were not re-lacquered. The Enfield tank remains unused, but the Norton has done maybe 2500 miles since then, with no effect on the lines whatsoever. They are as good as the day they were first painted. They were masked, not freehand painted, so there is a bit of an edge, but no-one has ever commented on that, save to say how good the tank looks. I would have preferred to have had them painted freehand, but that option was not available.
It is simply down to personal preference imo. You pays yer money etc....
Ian
- Log in to post comments
Ian - why did the lines not…
Ian - why did the lines not go on before the first lacquer coat? Was the lacquer just for protection in transit?
Also - did he lacquer the chrome? The modern chromesprays (e.g. http://www.chromespray.co.uk/) look like they might be the future now chrome plating looks like becoming more likely to be killed off by environmental concerns, and they are lacquered. Sorry going off topic.
- Log in to post comments
Dave. If you attempt to line…
Dave. If you attempt to line the tank without lacquering it first, the paint will get finger-marked, and you will not be able to get those marks out. Hence lacquer, flat, transport to pin-striper, lining done, back to the sprayer who will clean off the lacquer, before applying the final lacquer coat.
George's tank is not chromed, but in my case, no, the chrome is not lacquered. It would lose some of it's brilliance, and anyway is unnecessary. As I mentioned, I did not have my stripes lacquered. I am quite happy with it as it is, but to each their own. I can understand it would feel smoother if lacquered.
- Log in to post comments
Thanks Ian. That, along with…
Thanks Ian. That, along with the comments of ian McD, David and Norman is very constructive. I'll ponder on.
George
- Log in to post comments
Tank lines and laquer
All of this is interesting as I've just been experimenting with a spare tank for my Mercury. The original tank has suffered from ethanol dissolving the internal liner that was put in back in 2003, so needs sorting out.
With the spare tank I've experimented with spray can paints, ethanol proof laquer and enamel paint for the lines on the tank and would agree with some comments above i.e. get the tank painted and then laquered before putting on the enamel lines. The ethanol proof laquer from Halfords has to be applied in three coats within an hour otherwise it reacts and causes crazing, which mine did!
I've tried two lining tapes to form the curves for the "pinstriping" and the 3M vinyl tape 471 is far superior as it follows a tighter radius without creasing, which is important as it stops paint bleeding under the edges. The 3M tape was purchased from the Grove group www.grovegroup.co.uk at their Taunton shop where I could buy just one roll for £2.23. To reduce the "edge" of these lines I removed the tape before the paint has fully dried, say after 1/2 hour.
The enamel paint was 1Shot paint, which is really good and I bought some special brushes from Wrights of Lymm to apply the paint. Overall it has cost about £50 to make the tank usable until I get the original one back into service.
The stick on knee grips were used because the previous owner of the tank had filled the holes for the metal badges with BRAZE! I wasn't confident that I could accurately drill out the holes and re-tap them without causing holes in the side.
Phil.
- Log in to post comments
Thanks Phil. Some good info…
Thanks Phil. Some good info and contacts there.
George
- Log in to post comments
I found that the Halfords…
I found that the Halfords petrol resistant lacquer is poor quality, as you say it reacts with the paint and has a poor spray pattern. I’ve bought a can of simoniz petrol resistant lacquer from Dorset Auto spares to see how that fares,
They can also make up cans, (via Allparts) the can I bought for my metallic dark green Toyota worked really well.
If it were my tank I’d send it to JBS and let them make the decision!
Dan
- Log in to post comments
Thanks, Ian. Interesting…
Thanks, Ian. Interesting thread because my Dommie tank has had a knock, and it is painted and lined in 'traditional' Norton style (i.e. no chrome strips). I think I'll just call it 'patina'.
- Log in to post comments
I use the 3M tape as well
And this is the result. One shot paint like Philip: I've found this to be reasonable petrol resistant in the past.
It's not as good as a professional hand lining job but much cheaper!
- Log in to post comments
That looks a pretty good job…
That looks a pretty good job Ian! Don't give George ideas.... I bet it took you ages to mask it evenly on both sides?
- Log in to post comments
I'm impressed
by the quality of the finished work being shown in the various attachments and it has left me wondering how the owners who do their own pinstriping manage to apply the masking tape in smooth and equal curves. My own, distinctly amateurish, efforts to date have resulted in what can perhaps best be described as 'the large-scale threepenny-bit effect'. Any tips?
- Log in to post comments
Mine aren't as good as I'd like....
Not quite threepenny bit - 50p piece? but the way I do it is to stick one end down then apply the rest by holding the tape reel at some distance and applying it with a finger while arcing the reel sideways. Much harder to describe than do. The key is not to try to follow a curve bit by bit but to go for a wide sweep.
The 3M tape does allow you a couple of attempts to reapply it if you get it wrong but it is something of a fraught process.....
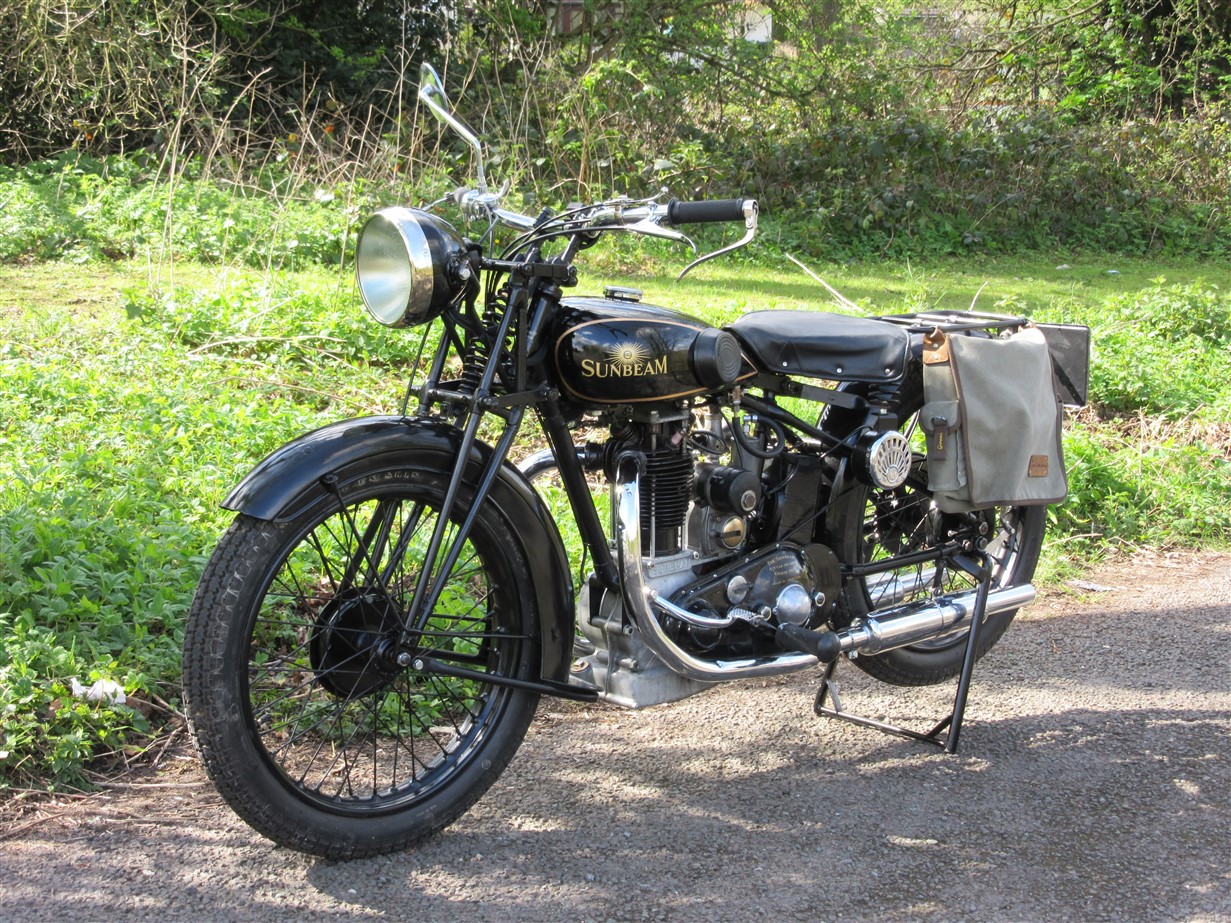
This is the Sunbeam I did in a similar way a couple of years ago, but I used a gold aerosol here rather than the OneShot enamel.
- Log in to post comments
Some helpful contributions…
Some helpful contributions in this thread, so I will and try and continue the conversation.
Yes, Howard it is tricky to get smooth curves with the tape. One slight flat for just 1/2" shows when the tape comes off. Your eye is also very sensitive to the width of the black line if it varies.
It only answer is practice. Spray up a flat steel sheet, or an old gallon oil can, at the same time as doing the tank and practice the lining on that. You need a starter curve to follow, and I have used tape and measurements to get the lines where I want them. Then a fine black felt tip line which will end up under the black paint line. Pull that starter tape off and put the final tapes on using the black felt tip line as direction guide. As Ian says you have to keep both hands moving at all times - one applying the curve with a 6-12" free length and the other smoothing it down in a continuous slide. If either hand hesitates there will be a straight segment.
Also put a transfer on this practice sheet and then apply the final lacquer. Beware that the enamel paint and transfer will usually crinkle if the first lacquer coat goes on too thick and gets too wet. The usual guidance is to apply a 'dust' coat, wait, another 'dust' coat, wait, then normal thicknesses.
- Log in to post comments
I use Humbrol clear varnish...
... on my transfers as advised by Classic Transfers. I haven't dared try to dust them over with acrylic or anything else and am relying on being very careful on filling up.....
- Log in to post comments
Many thanks
Ian and Norman for your helpful responses. I'm intending to have another foray into the world of painting curves (something that Rubens was rather good at, I believe) as soon as it becomes warm enough for achieving a reliable and stable finish. As you say Norman, practice leads, if not to perfection, then at least to a marked improvement. I particularly like your wrinkle (oops! - inappropriate choice of word) using a felt tip as an interim guide to the finished line.
- Log in to post comments
If anyone is interested
This page shows progress from dented and rusty original (blasted and primed) to more or less its current state.
- Log in to post comments
I like it, Ian! I'm not…
I like it, Ian! I'm not keen on a computer-printed look anyway.
Have you tried removing small 'dings' using an attachment temporarily stuck to the tank with a glue gun, and using a screw or slide hammer of lever? I'm thinking of experimenting since I have a small ding on a chrome tank. Maybe I need to find an old car hub cap to practice on. There are various devices available.
This caught my eye:
https://www.ebay.co.uk/p/Willkey-Auto-Car-Body-Dent-Remover-Repair-Puller-Kit-Tools-E6c6/4014354020?iid=113155294522&chn=ps
But this looks fun:
https://www.youtube.com/watch?v=UB0eRYHtpYo
... he calls it a parody (e.g. metric vicegrips)...
- Log in to post comments
You've made an excellent job…
You've made an excellent job of that, Ian. Well done!
I do hope nobody takes David's video too seriously. I love the match in the tank to clear !!
Then the bare wires poked into the socket!!!
George
- Log in to post comments
Norton tanks are very solid
At least the Bracebridge ones are. I'm not sure whether the pulling out method would work but in any case I have neither the kit nor the expertise.
I did consider trying lead loading which would be in period but ended up going for the old standby Isopon.
- Log in to post comments
dings in Norton Tanks
Hell Now I have seen this sort video some time ago But you cannot do that same with Norton Tanks there much thicker and stronger then Honda tanks you need a mini gas welder like I have a brase a 1/4 stud on to pull out dings just do the same with large alloy pipe and a wide washers and a nut the draw out the ding or dent for painting tanks flat off to bear metal then you build up you layers of paint starting with 3 thin coats of Zinc Primer P182 let it dry for 2 days next your base primer in yellow or white spray two coats let dry for a good 24 hours next base coat silver or any other colour you need at lest 3 thin coats let dry for 24 hours next top coat of lacquer in thin coats two to three coats you can get anti ethanol lacquer but this is expensive,please Note Not all Lacquers are petrol proof including some water base paints the thing is to do your research first and for any lining you can get a lining wheel kit makes perfect lining or you can do it the hard way with lining tape comes in different colours and best spray gun is a HMPV mini gravity feed Spray gun these make a lot less after spray but you still need to use your Safety wear and good safety clothing good result are 90% preparation and 10% finnish yours anna j
- Log in to post comments
That's all very well
.... if your tank doesn't have deep rust pits like mine. It would have needed dozens of coats to bring the level up, with the risk of shrinkage.
I know Isopon is not necessarily appropriate for older bikes (although I remember using it in the 60s) but it does the job.
- Log in to post comments


Hello All Members now for painting not all Nortons where painted in the Norton standard colour of Black And Silver and here's why Most Norton Motorcycles where built for export market witch was the main income of the Norton Motors Bracebridge Street now Home models most of these where in Norton standard colours ,but some where in more colorful paint schemes and some where early motorcycles in the 1950s and there for the lining was not all ways red and black the polychromatic light blue machines had white and black lining and post office red machines had gold and black lining So there you have it by the time 1960 came around Norton went two tone colours except for export motorcycles witch where mostly all one colour ,other then black and silver and after 1963 the colours of Nortons then went back to more mundane colours and standard colours of black and silver, and so did the export motorcycles a plumbstead plan in money saving and there idea of less is more, but buy then the rot had set in, and motorcycle industry was declining as new cars were getting cheaper and japanese machines were coming on stream, so a double wamie for british motorcycles and the industry had not the chance to retool the industry so please do your research on your motorcycle to find the factory colour it came out in, yours anna j