
Hi to all you with good knowledge on rebuilding bikes.
I have just had the frame & everything powdercoated & looking good, my next job is to reassemble bits back into mass & this is where I am a little stuck in that I cant seem to get started in deciding where to start, so not getting going. I would be grateful to someone to give me the guidance that I am lacking, think its an age thing I'm close to 66 things have started to slow down lol.
Regards Jim Tarr, Dunster, Somerset
Build up a basic rolling c…
- Log in to post comments
Hi. Get theforks, swinging…
Hi.
Get theforks, swinging arm, shocksand wheels together first along with the mainstand (although don't screw the mainstand bolts fully home yet). Don't forget to loosely bolt on the sidestand lug if fitted. Fit the underseat tool box. Fit the frame spacerthat mounts the rear engine platesbut don't tighten it fully yet. Fit mudguards if you want to, although I'd leave them until later to avoid any accidental damage. If the bikes going to be moved much during the rebuild, fit the handle bars and front brake lever/cable otherwise leave them off - they're bound to get in the way at a critical moment or you'll scalp yourself/get a black eye/catch your earon them.
Get the engine bottom end together but don't bother with the pistons, oil pump,timing gears and chains just yet - these add weight and can all be fitted later. The gearbox - fit new bearings and oil seal into the main shell, then - important -the gear change quadrant and camplate along with its plunger and make sure they're correctly meshed. Don't bother with the rest of the gearbox yet. LOOSELYbolt the engine bottom end, gearbox and plates together along with the battery box/oil tank platform (gives you something to hang on to). This should leave you with a reasonably manageable lump to put in the frame although it is best to have someone there to put in the frame/engine plate mounting bolts. Once the lump is in, tighten the mainstand bolts and loosely fit their throughbolts as well. Havingthe basic rolling chassis built up plus the mainstand mean you can rest your upper body on the frame while lifting the engine assembly in from the left hand side of the bike whilst a friend puts in the bolts from the right. Lightly nip all the bolts up but don't fully tighten until later whenthe top end of the engine is assembled along with the head steady.Fit mainstand spring.
Now assemble the engine timing gear and gearbox. Fit the engine top end along with carbs andthe head steady and tighten everything up. Fit the battery box and oiltank. Tighten side stand into position. Fit gearbox sprocket, rear chain andrear chainguard.Check mainstand bolts for tightness, fit footrest spindle and spacer, fit primary drive inner case, clutch, enginesprocket, alternator. Time magneto/distributor. Don't fit the outer chaincasecase just yet.
Incidentally, a REALLY useful tool to have is two old clutch plates (one of each type) rivetted together and bolted (including two 1/2" spacers) to a long metal handle ( I use a 2'6" length of 1"x1/4" thick steel 'strapping' from the builders' merchants). This slips over the clutch body to hold it when it's nut (or the mainshaft nut on the otherend)is being tightened and, also, with the spacers enabling it to be inserted into the clutch, locks the primary drive so the engine sprocket nut can be tightened. Also handy to have is an old clutch 'spider' (the inner part of the clutch shock absorber). This can be held with a big set of stilsons while, with the gearbox in gear,the gearbox sprocket nut is tightened with a ring spanner.
Fit handlebars along with cables, wiring loom, head light assembly plus horn rectifier etc. fit mudguards (check they don't foul the fork shrouds), and odds 'n' sods. Once clutch cable fitted, adjust clutch and check clutch lift andaction. Buy a year's supply of RTV and use it all assembling outer primary chaincase to make it oil tight - it is possible!
Fit footrests, exhaust system, brake pedal, tank strap, tank, seat, batteryand anything else (that I've) forgotten. Fill with oil and petrol (you haven't let the petrol tap corks dry out - have you?). I usually leave the spark plugs out and kick like hell until I see oil returning to the tankbefore starting up for the first time.
Enjoy.
Ian.
- Log in to post comments
Not the RTV! if the chainc…
Not the RTV! if the chaincase is flat and the surfaces OK, and it's not difficult to gently (well, with the appropriate hammers) get the inner and outer chaincases back to how they should be, just use a new rubber seal, fitted the correct way round (the common mistake) and lots of grease and IT WILL HOLD OIL! Honest, especially if you don't over-tighten the chaincase nut. After all, you do want to do the job properly, don't you? Were you paying attention Ian? There will be a small test afterwards...
- Log in to post comments
How dare yousuggest that I…
How dare yousuggest that I would overtighten my chaincase nut - I have never been so insulted....................oh, wait................ girl..........pub............last Saturday night........................
Once I've beaten the outer chaincase back into shape afterprevious owners have screwed the big nut up toits last squeaking torturedthread and I've persuaded the contorted stiffeningribs back into shape, re-flattened the centre section andthe distorted washer that fits under the nut and the surface on which it rests, removed as many of the scuffs and screwdriver marks from the sealing band mating surfacesas possible, when at some time in its life, the side-stand has made 'intimate contact' with both parts of the case (i.e. f***ed it), when the inner case has been pushed so farsideways that therear chain has worn through the inner caseand the clutch adjuster has wornthrough the outer case, when the metal is sostretched to buggeryand assembling the cases off the bike showsthem to beso bowedthere is no way that the outer will ever be a snug fit again, even with a thin band of neoprene undera correctly fitted newseal, when I've shimmed up all the mounting points to make sure the inner case stays flat - when I screw the securing nut on with just two threads teasingly peekingout -and it still leaks -thenI reach for the RTV!
Just along the bottom half, mind you, bit of grease along the top half,soI can get the case off again. Its all easily removed with petrol although let the sealing band dry out thoroughly afterwards.Someone has suggested rubber grease which sounds very plausiblebut I've yet to try it. ALL ofthe above faults were found on my ES2,the Dommi I'm presentlyrestoring has had a a more sympathetic previous owner (my Dad) and if I can get away with no RTV - I will.
Oh -first check that the oil running along the bottom frame tube is actuallyfrom the case and not the gearbox oil seal, or, in the case of a single, from the timed engine breather behind the caseunder the crank driveshaft.
Not so much a small test in my (primary) case- more a minor ordeal!
Cheers.
Ian.
- Log in to post comments
Blimey Ian, I do rather su…
Blimey Ian, I do rather suspect that you know how to deal with primary chaincases after all! From time to time I have seen the most appalling and usually unsuccessful chaincase bodges with industrial quantities of RTV all over the place. Of course I would never have done that - only because RTV wasn't invented when I was a lad... I have found that oil can and will leak where the chaincase is held up against the crankcase by its 3 screws and of course where the gearbox mainshaft enters the chaincase. But I just regard that as an anti-corrosion feature. Oddly, as I don't use the Norton every day, it does wet sump a bit and on starting will force some engine oil past the drive side oil seal into the primary chaincase, more than making up for any slight losses. So when it gets its annual desultory service, I actually drain a little surplus oil from the chaincase rather than having to top up.
-6 outside. Brr. The bike's staying in the shed. Gordon.
- Log in to post comments
Yes, I admit,Iwas being a…
Yes, I admit,Iwas being a bit facetious regarding the amount of RTV involved!!! I did manage to temporarily halt the leak from where the mainshaft/sleeve gear enters the case by sandwiching a piece of neoprene (or nitrile - whichever is oil resistant)between the sliding discs with a suitably sized hole - effectively a home-made, if somewhat primitive,oil seal. This gave up the ghost after a couple of thousand milesbut I haven't bothered with itsince as the leak is so minorit's easilydealt withby simply fitting a piece of carpet felt 2"X4" hidden on top of the bottom rear mounting bracket to soak up the odd offending drip! When I next take it apart I'll look for a better solution.
I haven't gone down the belt drive route as I find,as long asoil stays in the primary chaincase and everything iscorrectly adjusted in the first place, thatprimary drive maintenance is minimal.
Cheers.
Ian.
- Log in to post comments
Previously wrote: Yes, I a…
Previously wrote:
Yes, I admit,Iwas being a bit facetious regarding the amount of RTV involved!!! I did manage to temporarily halt the leak from where the mainshaft/sleeve gear enters the case by sandwiching a piece of neoprene (or nitrile - whichever is oil resistant)between the sliding discs with a suitably sized hole - effectively a home-made, if somewhat primitive,oil seal. This gave up the ghost after a couple of thousand milesbut I haven't bothered with itsince as the leak is so minorit's easilydealt withby simply fitting a piece of carpet felt 2"X4" hidden on top of the bottom rear mounting bracket to soak up the odd offending drip! When I next take it apart I'll look for a better solution.
I haven't gone down the belt drive route as I find,as long asoil stays in the primary chaincase and everything iscorrectly adjusted in the first place, thatprimary drive maintenance is minimal.
Cheers.
Ian.
Thanks Ian & Gordan,
for all your good advice, I am beginning to get going? lacking a few important bits was the main reason for inactivity, parts I should have ordered months if not years ago, no organisation!!
At the moment I am compiling a list to get & am baffled as to whether it is a bolt or stud which holds the front wheel spindle on the left side, can you help? thanks again Jim
- Log in to post comments
The front wheel spindle is…
The front wheel spindle is clamped by a 26tpi nut on a stud. I have never extracted the stud from my forks, but I would expect it to be whitworth threaded (20 tpi for 1/4"?) where it goes into the fork leg. Always use a short ring spanner when tightening up this nut to prevent over-torquing and cracking the boss. Gordon.
- Log in to post comments
Looking slightly ahead I h…
- Log in to post comments
Hi. To add to Gordon's ad…
Hi.
To add to Gordon's advice on the front spindle nut, beware of a spindle that has been re-chromed as it may have been so abraded and polished at the chromers thatits diameter can be significantly reduced which adds to the danger of the fork leg clamp cracking. If in doubt get a new (stainless) one.
As far as your rims are concerned its probably safer to replace them. I have heard of a case where a re-chromed rim had been polished so much that it fractured when the bike was being ridden. The front brake, if properly set up, isn't bad although fitting a twin leading shoe would be an effective (and cheaper)alternative to disc(s). Just make sure you have the right levers (7/8" from pivot to nipple centre - most are 1") which makes a big difference to the effectiveness of the brake (and clutch if AMC).
As far as the rest of the bike is concerned it depends on what you want to do with it, i.e. ride it often/occasionally, thrash/nuture it, show it or sell it. Keeping the bike in original order does affect its value but as long as any changes you make are easily reversed and you keep all the bits safe, sound and labelled you can always put it back together as it was originally or sell them with the bike. I say 'originally' meaning 'back to standard' as it left the factory - not 'originally' as inkeeping the orange binding twine (remember that - before the nylon cable tie?)keeping it together when it was found in the barn along withthe Dexion headlamp brackets and B&Qshower hose oil pipes! There are those who argue that restoring a bike robs it of its history but if you want to ride it, safely and reliably, then you do what you have to do.
I first saw my ES2 painted in yellow and orange paint with a big pair of ape-hangers fitted back in 75. Someone, somewhere has a photo of it with the front forks ripped off it.When I got it, it was a mixture of different years, painted in Triumph blue and had only three studs holding the top end on. It's now virtually as it left the factory and is extremely reliable, usuable and it's ridden pretty hard. It's been a running restoration over the 34 years I've owned it and I feel that this restoration progress over the yearsisan equallyvalidpart of the bike's history.
Good luck with the Dommi.
Ian.
Attachments 1ES2-3.jpg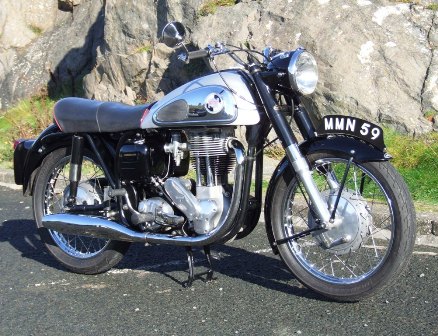
- Log in to post comments
Primary case leaks can be…
Primary case leaks can be confusing, I use EP 90 (green) oil in the gearbox, ATF (red) in the primary and dirty brown! in the motor, this has helped me to realise that my primary does not leak!.I have RTV'd the rubber seal to the inner case and ditto to the alt cable grommet but thats all it needs.I'm lucky that metal parts are all in good condition,the breather vents to the tank.
- Log in to post comments
If you want to replace the…
If you want to replace the wheel rims, just use chrome replacements. If you use wax polish on them they should last a long time. Disk brakes look out of place on a Dominator, and the drum brake works as well as a Commando disk if it is properly set up. I will admit to a Commando disk brake on my Manxman based cafe racer, but that is no where like original and was built from a bunch of parts from various sources, and I got a great deal on a bent Commando front end at a swap meet.
Colin.
Previously wrote:
Looking slightly ahead I have noticed that the chrome on front & rear wheels is not what you would call good condition which leads me to the question what do I do ? have the rims replaced with stainless or do I upgrade to discs on the front ? should you keep bike in original order because messing around effects finished bikes value?Be good to hear what you think based on your knowledge. Jim
- Log in to post comments
Previously wrote: Primary…
Previously wrote:
Primary case leaks can be confusing, I use EP 90 (green) oil in the gearbox, ATF (red) in the primary and dirty brown! in the motor, this has helped me to realise that my primary does not leak!.I have RTV'd the rubber seal to the inner case and ditto to the alt cable grommet but thats all it needs.I'm lucky that metal parts are all in good condition,the breather vents to the tank.
hello DO NOT USE ATF RED oil it buggers the rubbers up In the Clutch Center . . Yours Anna J
- Log in to post comments
Previously wrote: Hi. Get…
Previously wrote:
Hi.
Get theforks, swinging arm, shocksand wheels together first along with the mainstand (although don't screw the mainstand bolts fully home yet). Don't forget to loosely bolt on the sidestand lug if fitted. Fit the underseat tool box. Fit the frame spacerthat mounts the rear engine platesbut don't tighten it fully yet. Fit mudguards if you want to, although I'd leave them until later to avoid any accidental damage. If the bikes going to be moved much during the rebuild, fit the handle bars and front brake lever/cable otherwise leave them off - they're bound to get in the way at a critical moment or you'll scalp yourself/get a black eye/catch your earon them.
Get the engine bottom end together but don't bother with the pistons, oil pump,timing gears and chains just yet - these add weight and can all be fitted later. The gearbox - fit new bearings and oil seal into the main shell, then - important -the gear change quadrant and camplate along with its plunger and make sure they're correctly meshed. Don't bother with the rest of the gearbox yet. LOOSELYbolt the engine bottom end, gearbox and plates together along with the battery box/oil tank platform (gives you something to hang on to). This should leave you with a reasonably manageable lump to put in the frame although it is best to have someone there to put in the frame/engine plate mounting bolts. Once the lump is in, tighten the mainstand bolts and loosely fit their throughbolts as well. Havingthe basic rolling chassis built up plus the mainstand mean you can rest your upper body on the frame while lifting the engine assembly in from the left hand side of the bike whilst a friend puts in the bolts from the right. Lightly nip all the bolts up but don't fully tighten until later whenthe top end of the engine is assembled along with the head steady.Fit mainstand spring.
Now assemble the engine timing gear and gearbox. Fit the engine top end along with carbs andthe head steady and tighten everything up. Fit the battery box and oiltank. Tighten side stand into position. Fit gearbox sprocket, rear chain andrear chainguard.Check mainstand bolts for tightness, fit footrest spindle and spacer, fit primary drive inner case, clutch, enginesprocket, alternator. Time magneto/distributor. Don't fit the outer chaincasecase just yet.
Incidentally, a REALLY useful tool to have is two old clutch plates (one of each type) rivetted together and bolted (including two 1/2" spacers) to a long metal handle ( I use a 2'6" length of 1"x1/4" thick steel 'strapping' from the builders' merchants). This slips over the clutch body to hold it when it's nut (or the mainshaft nut on the otherend)is being tightened and, also, with the spacers enabling it to be inserted into the clutch, locks the primary drive so the engine sprocket nut can be tightened. Also handy to have is an old clutch 'spider' (the inner part of the clutch shock absorber). This can be held with a big set of stilsons while, with the gearbox in gear,the gearbox sprocket nut is tightened with a ring spanner.
Fit handlebars along with cables, wiring loom, head light assembly plus horn rectifier etc. fit mudguards (check they don't foul the fork shrouds), and odds 'n' sods. Once clutch cable fitted, adjust clutch and check clutch lift andaction. Buy a year's supply of RTV and use it all assembling outer primary chaincase to make it oil tight - it is possible!
Fit footrests, exhaust system, brake pedal, tank strap, tank, seat, batteryand anything else (that I've) forgotten. Fill with oil and petrol (you haven't let the petrol tap corks dry out - have you?). I usually leave the spark plugs out and kick like hell until I see oil returning to the tankbefore starting up for the first time.
Enjoy.
Ian.
Hello Well To me your doing things the Hard way . You do not need wheels in or Forks . After you have rebuilt your motor and gear box . and given the clutch a rebuild as well The best way to fit the motor in one go it to lay the frame on its right hand side then get your motor and lay this in on its right side in the frame .then fit rear right engine plate then fit gearbox to right rear engine plate then fit left side rear engine plate bolt all up . now you can lift the hole thing up and fit front engine plates . then fit side stand you must have the main stand in first before starting with the motor. and box . next is to fit you forks once you forks are in place . next its to lift the frame ETC up on a box too fit the wheels. once wheel are in place you can then fit inner chain case and clutch then the main drive sprocket 22 tooth this the best to the engine drive shaft fitting alternator housing first , then the rotor and alternator. all that is left is outer chain case . Ps note that when fitting rear engine plates don't forget the foot rest fittings that go in between the engine plates and the one that goes behide the inner chain case. these have to be fitted in first before fitting inner chaincase and before fitting the inner chaincase its always best to fit a chain too rear sprocket on the rear wheel . then fit chaincase. clutch etc. your anna J
- Log in to post comments
Build up a basic rolling chassis first - easy to move about - then the engine bottom half and gearbox into the engine plates and then lift that lot into the chassis. Then on with the transmission then engine top half then electrics and then the rest of the bits. Easy, eh? Gordon.
P.S. If you make the drilled hole in the bottom of the rear engine plates into a slot, you can fit the rear engine plates and gearbox first, then the engine bottom half. Easier to lift the separate units, especially as, like me, you won't see 60 again.